America’s Test Kitchen’s Roasted Carrots

ATK-roasted-carrots-12-2016-1 ATK-roasted-carrots-12-2016-2 ATK-roasted-carrots-12-2016-3 ATK-roasted-carrots-12-2016-4 ATK-roasted-carrots-12-2016-5

This is a beautiful recipe – three ingredients and perfection, thanks to America’s Test Kitchen.  The world is of the day is caramelization.  The perfection is in the preparation and precise directions, which are simple to follow.  Don’t judge, this beautiful dish is next to pizza rolls, and I don’t care what you think. 😉  This blog is for entertainment and sharing the love of cooking/baking, not to impress at every turn.

INGREDIENTS:

  • 1 1/2 lbs. carrots, peeled, halved crosswise, and cut lengthwise if necessary to create even pieces
  • 2 tablespoons unsalted butter, melted
  • Table salt and ground black pepper (freshly ground is always best)

DIRECTIONS:

  1. Adjust oven rack to middle position and heat oven to 425 degrees F.
  2. In large bowl, combine carrots with butter, 1/2 tsp. salt and 1/2 tsp. pepper; toss to coat.
  3. Transfer carrots to foil or parchment-lined rimmed baking sheet and spread in single layer.  (Use the largest baking sheet that you have.)
  4. Cover baking sheet tightly with foil and cook for 15 minutes.
  5. Remove foil and continue to cook, stirring twice, until carrots are well browned and tender, 30-35 minutes.
  6. Transfer to serving platter, season with salt and pepper to taste, and serve.


Print Friendly, PDF & Email

Delicious Won Ton Soup

wontonsoup1

wontonsoup2

We are huge fans of won ton soup and have purchased too many containers of it from take out, so I wanted to learn how to make it myself.  I have been making this a few years now.  It fills your home with a wonderful aroma of simmering broth, sesame oil (a must!), and authentic Chinese flavors.  This recipe is from About.com’s Chinese cooking section, by Rhonda Parkinson.

**I usually double this recipe because it goes so quickly.** 

INGREDIENTS

    • 18 – 24 won ton wrappers

Filling:

    • 1/2 pound boneless lean pork, chopped finely (I used ground pork for ease)
    • 1 tablespoon soy sauce
    • 1 tablespoon oyster sauce
    • a few drops sesame oil
    • 1 teaspoon sherry
    • 1/2 teaspoon sugar
    • 1 green onion, finely minced
    • 1 teaspoon cornstarch
    • 2 dashes of white pepper

Other:

    • Water for boiling won tons
    • 4 1/2 – 5 cups chicken stock
    • green onion, thinly sliced, as desired
    • a few drops sesame oil
  • Prep Time: 15 minutes
  • Cook Time: 15 minutes
  • Total Time: 30 minutes
PREPARATION

Combine all the filling ingredients in a bowl, mixing well. Lay one won ton skin in front of you. Cover the remaining won ton skins with a damp towel to keep them from drying out.
Filling the won tons: Moisten all the edges of the won ton wrapper with water. Place a heaping teaspoon of won ton filling in the center. (My tip:  Don’t overfill wonton or it’ll burst).  If these directions are too confusing, look at the graphic on the won ton package on how to fill and seal.
Fold the won ton wrapper in half lengthwise, making sure the ends meet. Press down firmly on the ends to seal.

Use thumbs to push down on the edges of the filling to center it. Keeping thumbs in place, fold over the won ton wrapper one more time. Push the corners up and hold in place between your thumb and index finger. Wet the corners with your fingers. Bring the two ends together so that they overlap. Press to seal. The finished product should resemble a nurse’s cap. Repeat with remaining won tons.

Alternate method: Place the teaspoon of filling in the middle of the wrapper and twist to seal. The final result should resemble a money bag or drawstring purse.

Boiling the won tons: Bring a large pot of water to a boil. Add the won tons, making sure there is enough room for them to move about freely. Let the won tons boil for 5 – 8 minutes, until they rise to the top and the filling is cooked through. Remove from the pot with a slotted spoon.

To make the soup: bring the chicken stock to a boil. Add the won tons and bring the soup back to a boil. Add the green onion, remove the pot from the heat and add the sesame oil, stirring.

My tip:  To save effort I’ve boiled the won tons in the actual chicken stock, but to each his/her own.

Ladle into soup bowls, allowing 6 won tons per person.

Print Friendly, PDF & Email

Yummy Garlic Bread in Bread Machine

garlic-bread-in-machine-11-2015

Garlic bread in the bread machine.  It sounds impossible, but it isn’t at all!  I made this at Thanksgiving and it came together so quickly.  It’s a fast recipe!  The only rule is to make sure you follow your bread machine’s directions of adding the ingredients in the correct order.  Most state liquid ingredients on the bottom of the bread pan, dry ingredients in the middle, and make a little well in the dry ingredients on the top, and put your yeast there.  Don’t let your yeast touch the wet ingredients on the bottom.

INGREDIENTS:

  • 1 cup warm water (110 degrees F)
  • 1 tablespoon butter (use unsalted to control the salt)
  • 1 tablespoon dry milk powder
  • 1 tablespoon white sugar
  • 1 1/2 tsp. salt
  • 1 1/2 tablespoons dried parsley (dried is fine)
  • 2 tsp. garlic powder (use your freshest garlic powder for best results)
  • 3 cups BREAD flour
  • 2 tsp. active dry yeast

DIRECTIONS:

  1. Place ingredients in the pan of the bread machine in the order recommended by the manufacturer.  (Most bread machines state this order, but check your manual first!!
    Liquid ingredients on the bottom of the bread pan
    Dry ingredients in the middle
    And make a little well in the dry ingredients on the top, and put your yeast there.  Don’t let your yeast touch the wet ingredients on the bottom.)
  2. Select basic bread cycle and 2 lb. loaf, press Start.
Print Friendly, PDF & Email

Crock Pot Cannellini Minestrone Soup

Crockpot Minestrone Soup

This recipe came out of a Crock Pot branded book.  It was fantastic and very healthy.  Don’t be scared of using the escarole.  It looks like lettuce; just rinse and dry it well (or use a salad spinner), and cut into ribbon strips as directed.  It really adds a lot to the appearance and provides healthy vitamins and nutrients.  Make sure you cook on low for at least 6 hours+ as you’re using hard beans.  If you don’t want to do that, get a can of the beans, drain, rinse, put in fridge.  Then add in the 30 mins to one hour of cooking.

Makes 6-8 servings, depending on serving size.

INGREDIENTS:

  • 4 cups chicken broth*
  • *(If not homemade broth, make sure the first ingredient is chicken, not salt!  If not making it myself, I buy “Better Than Bouillon”) 
  • 1 can (14.5 oz.) diced tomatoes, undrained
  • 1 can (12 oz) tomato-vegetable juice *****
  • 2 cups escarole, cut into ribbons
  • 1 cup chopped green onions
  • 1 cup chopped carrots
  • 1 cup chopped celery
  • 1 cup chopped potatoes
  • 1/4 cup dried cannellini beans, sorted and rinsed
  • 2 tablespoons chopped fresh chives (I used dried)
  • 1 tablespoon chopped, fresh flat-leaf parsley (I used fresh)
  • 1/4 tsp. salt
  • 1/4 tsp. black pepper
  • 2 ounces uncooked ditalini pasta

*****I didn’t buy the tomato-veg. juice; I used a 1/2 can of 14 oz. tomato sauce and added 1 cup vegetable broth.

DIRECTIONS:

  1. Place all ingredients except pasta into slow cooker.
  2. Stir well to combine.
  3. Cover, cook on low 6-8 hours or on high 4-6 hours.
  4. Stir in pasta.  Cover, cook 20 minutes or until pasta is tender.


Print Friendly, PDF & Email

ATK Beginner’s Pulled Pork (Slow Cooker) * (Not IC Safe)

ATK_pulled-pork-12-2015-firstpic

ATK-pulled-pork-12-17-2nd pic

ATK-pulled-pork-12-17-3rdpic

This recipe is EXCEPTIONALLY NOT I.C. Safe. I’m keeping this up for people searching for this recipe, but please don’t make it if you have an IC bladder.

This is a great entree from America’s Test Kitchen via the slow cooker.  It is quick to assemble, but it’s just a waiting game in two stages.  First the spice and refrigerate overnight waiting game and then the slow cooker wait.  Pay attention to trim and quarter the roast.  I bought two 2.5 lb. roasts and halved them, but you can purchase a 5 lb. roast and quarter it – if you can find it.  We could only find 2.5 lb-ers and 8 lb-ers.  I omitted the cayenne pepper and it was just fine.  Enjoy!

To un-carb-ify it, I didn’t opt for a bun.  It would have looked better in the photo, but it is what it is.

–Honestly, I didn’t go through the braising liquid step.  Maybe next time!  I was tired and didn’t want another step.  It was just fine without doing that process, but next time I’ll try it.    

INGREDIENTS:

  • 1/4 cup packed brown sugar, plus extra as needed
  • 1/4 cup sweet paprika**
  • 1 T. garlic powder
  • 1 T. onion powder**
  • 1 T. ground cumin**
  • 1 tsp. cayenne pepper**
  • Salt and pepper**
  • One 5LB. boneless pork butt roast, trimmed and quartered
  • 1 cup BBQ sauce, (plus extra for serving if desired)**
  • Cider vinegar**

**Known IC irritants, tread carefully!

DIRECTIONS:

  1. Combine brown sugar, paprika, garlic powder, onion powder, cumin, cayenne, and 1/2 tsp. salt in a bowl.
  2. Using fork, prick pork all over.  Rub sugar mixture over pork, wrap tightly in plastic wrap, and refrigerate for 8-24 hours.
  3. Unwrap pork and place in slow cooker.
  4. Spread BBQ sauce evenly over pork, cover, and cook until pork is tender 9-11 hours on low OR 5-7 hours on high.  (Mine took about 8 hours on low in my Crock Pot).
  5. Transfer pork to large bowl, let cool slightly, then shred into bite size pieces, discarding excess fat.  Cover to keep warm.
  6. Let braising liquid settle for 5 mins, then remove fat from surface using a large spoon.  Season with salt, pepper, sugar, and vinegar to taste (if desired).
  7. Toss shredded pork with one cup of the braising liquid, add more liquid as needed to keep meat moist.  Serve with BBQ sauce.


Print Friendly, PDF & Email

ATK Rice and Pasta Pilaf *

ATK-Rice-a-roni-pilaf

I have a great substitute to Rice-a-Roni for you.  If you’re concerned, like I am, what goes into your boxed pantry goods, sometimes it’s good to make it yourself.  You will know exactly what the ingredients are and there won’t be any mystery flavorings or chemicals.  The best reward is that this tastes much, much better than the boxed version!  Thanks to America’s Test Kitchen for this recipe!  Enjoy! 🙂


*I used basmati rice because it has the most flavor for a dish like this.

*Be sure to use unsalted butter.  If all you have is salted butter, then don’t add the 1 1/4 tsp. salt. 

*I have raw and cooked onion issues so I subbed onion powder for the grated onion.

*If you want it vegetarian, replace chicken stock with vegetable broth.  


INGREDIENTS:

  • 1 1/2 cups basmati rice or other long-grain white rice
  • 3 T. unsalted butter
  • 2 ounces vermicelli, broken into 1″ pieces
  • 1 onion, grated, or onion powder *
  • 1 garlic clove, minced
  • 2 1/2 cups chicken broth
  • 1 1/4 tsp. salt
  • 3 T. minced fresh parsley

**Onion can be irritating to some IC sufferers, please know how you tolerate it first.  

DIRECTIONS:

  1. Place rice in medium bowl and cover with hot tap water by 2 inches; let stand for 15 minutes.  Don’t skip this step!
  2. Using your hands, gently swish grains to release excess starch.  Carefully pour off water, leaving rice in bowl.
  3. Add cold tap water to rice and pour off water.  Repeat adding and pouring off cold water 4-5 times, until water runs almost clear.
  4. Drain rice in fine-mesh strainer.
  5. Melt butter in saucepan over medium heat.  Add pasta and cook, stirring occasionally, until browned, about 3 minutes.
  6. Add onion and garlic and cook, stirring occasionally, until onion is softened but not brown, about 4 mins.
  7. Add rice and cook, stirring occasionally, until edges of rice begin to turn translucent, about 3 minutes.
  8. Add broth and salt, and bring to a boil.  Reduce heat to low, cover, and cool until all liquid is absorbed, about 10 minutes.
  9. Off heat, remove lid, fold a clean dish towel in half and place over pan, replace lid.  Let stand for 10 mins.  Fluff rice with fork, stir in fresh parsley, and serve.


Print Friendly, PDF & Email

Zucchini & Turkey Lasagna

zucchini-lasagna-11-2015

This is a wonderful, healthy recipe I took a chance on.  I had never made lasagna without the standard lasagna pasta noodles, ground beef, and multiple cheeses.  The downside of the typical lasagna it can be excessively heavy and greasy.  This healthier version was lighter, filling, and tasty, and packed a good vegetable punch.  We weren’t sure how it would turn out, so we added pasta layers to every other layer.  It was just fine without the pasta layer!

Even though the directions look lengthy, it actually was one of the easiest lasagnas I’ve ever made!

INGREDIENTS:

  • 2 1/2 tablespoons extra-virgin olive oil
  • 1 small onion, finely chopped (I used onion powder)
  • 1/2 teaspoon red pepper flakes
  • 1 lb. ground turkey
  • 1 (28 oz.) can petite diced tomatoes (Plain or Italian-flavored, if you desire)
  • 3 tablespoons chopped fresh oregano (I used dried this time)
  • 2 teaspoons salt
  • 2 medium zucchini
  • 1 cup part-skim ricotta cheese (I used 2%)
  • 1/4 teaspoon freshly ground black pepper
  • 1/2 cup freshly grated Parmesan cheese (2 ounces)

DIRECTIONS:

  1. Preheat oven to 375 degrees F.
  2. In a large skillet over medium heat, heat 2 tablespoons of the oil.
  3. Add the onion and red pepper flakes and cook, stirring occasionally, until the onion is tender, about 8 minutes.
  4. Add the turkey and cook, breaking up any large pieces with the back of a spoon, until brown throughout, 3-4 minutes.
  5. Add the tomatoes and bring mixture to a boil.  Reduce the heat to medium and simmer until it thickens, about 20 minutes.
  6. Stir in the oregano and salt.  Let cool.
  7. Slice the zucchini lengthwise into thin strips (about 1/8″ thick).
  8. Put 5-6 zucchini slices, overlapping slightly, in the bottom of a 8×8″ baking dish.
  9. Top with 1 cup of the sauce/meat mixture.
  10. Dot with 1/4 cup of the ricotta.
  11. Repeat the layers twice, alternating the direction of the zucchini  (I didn’t find the alternation especially pertinent).
  12. Top with the remaining zucchini and brush the top with the remaining 1/4 tsp. oil.
  13. Dot with the remaining 1/4 cup ricotta and season with the black pepper.  Top with Parmesan cheese.
  14. Bake for 50-60 minutes, until the lasagna is bubbling and the top is brown.
  15. Let stand for 10 minutes before serving.


Print Friendly, PDF & Email

Energy Balls (A Tidy Spherical Dessert) *

energy-balls-11-2015 energy-balls-11-2015_2nd

I found this recipe on the Washington Post, and altered it to fit our needs.  The original recipe had chia and/or flax seeds.  I used flax seeds the last time and something about them made my mouth itch and feel irritated.  So, I remade them this time with wheat bran and had no problem.  Wheat bran has 6g of fiber (24% of your day) in a 1/4 cup!  I found Bob’s Red Mill brand and it was affordable, unlike almond flour (LOL).

My son, age 9, would almost never eat sunflower seeds, peanuts, or raisins by themselves, but mixed in this awesome recipe, he’ll unknowingly gobble them down.  And I snuck in the wheat bran too!  I know him too well to know he wouldn’t eat it had I put cranberries in there, plus I can’t have cranberries, so it’s moot.

INGREDIENTS:

  • 1 cup creamy peanut butter (or any nut butter or faux nut butter)
  • 1/2 cup honey (add more if excessively crumbly)
  • 3 cups old fashioned oats
  • 1/4 cup wheat bran (such as Bob’s Red Mill)
  • 3/4 to 1 cup mini chocolate chips*
  • 1 cup total of (chopped peanuts / sunflower seeds / raisins*) combined**
  • 2-3 drops of vanilla extract

**1 cup any combination (that works for you) of nuts, seeds, soft dried fruits, raisins, cashews, peanuts, etc, sunflower seeds, or dried cranberries.

**Known IC irritants, tread carefully!

DIRECTIONS:

  1. Combine the nut butter and honey in a large mixing bowl and stir until smooth.
  2. Gradually add the oats and wheat bran until well combined. Add the chocolate chips and the nut-seed/fruit mixture, and mix gently to combine.
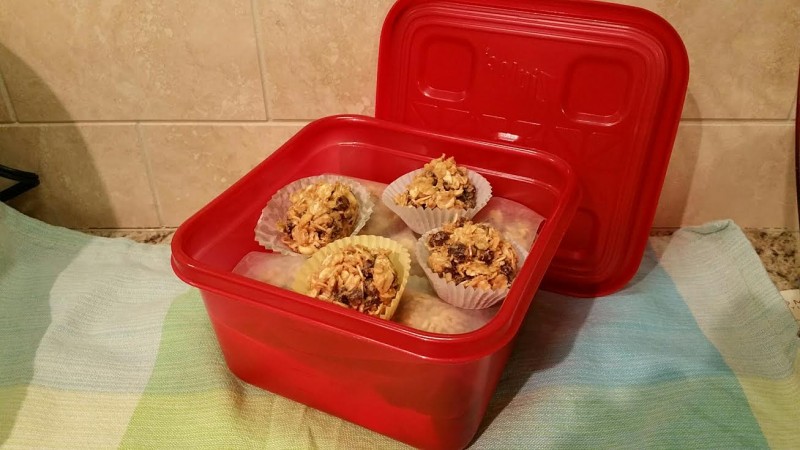
  3. NO BAKING NEEDED!   Use your hands to roll the mixture into balls (I used a cookie scoop for sanitation and uniformity) approximately the size of ping-pong balls. If desired, roll them in shredded coconut.
  4. Place the balls in paper mini-muffin cups. At this point, you can eat them, but they’ll be less sticky and less crumbly after a night in the refrigerator. They taste best after one day in the fridge.
  5. Layer the balls in an airtight container, using inexpensive wax paper (parchment paper is not necessary here)*** to separate the layers, and refrigerate for 7 to 10 days or freeze for up to 3 months.


***Parchment paper vs. wax paper debate:

–Parchment paper is for cooking and baking and can handle high temperatures, up to around 420 degrees F.  You can use it to separate the energy balls in a container for storage, but don’t.  Parchment paper is much more expensive than wax paper and is a waste to separate the energy balls.  I keep both parchment and wax paper on hand at all times.  Even though parchment’s safe in the oven, make sure your paper doesn’t extend beyond the rim of the baking sheet, the extended paper will brown horribly.

–Wax paper is NOT for cooking or baking.  It’s not heat safe, it’s covered in a wax coating to give it a smooth, non-stick surface.  It will smoke in the oven and cause a mess.  It can ruin your food! 

Here – Whisked Foodie explains it much better than I have time or desire to do, LOL:

Wax Paper Vs. Parchment Paper via Whisked Foodie

Print Friendly, PDF & Email

ATK Simple Refried Beans * (Not IC Safe)

ATK-refried-beans-11-2015ATK-refried-beans

A few years back, after tasting yummy refried beans at a restaruant, I wanted some for myself at home. I bought a can of it thinking, “How bad could it be?”  It was so bad and disgusting it turned me off to refried beans a very long time.  I had them recently at a restaurant and loved them, again.  I found this recipe on ATK’s site.  It took about 10 mins.  Super easy.  I had to omit the onions so I just used the bacon fat to sautee my minced garlic cloves instead.

If you don’t eat pork, you could substitute vegetable oil or olive oil.


INGREDIENTS:

  • 2 slices bacon
  • 1 small onion, chopped fine**
  • 2 garlic cloves, minced or pressed through a garlic press
  • 1 (15 oz) can pinto beans with liquid (do not rinse!)
  • 1/4 cup water
  • Kosher salt

**Known IC irritants, tread carefully!

DIRECTIONS:

  1. Heat bacon in 10-inch nonstick skillet over med-low heat until fat renders and bacon crisps, 7-10 minutes, flipping bacon halfway through.  Remove bacon and reserve for another use.
  2. Increase heat to medium, add onions to fat in skillet, and cook until lightly browned, 5-7 minutes.
  3. Add garlic and cook until fragrant, about 30 seconds.
  4. Add beans and their liquid, plus 1/4 cup water, and bring to simmer.
  5. Cook, mashing beans with potato masher, until mixture is mostly smooth, 5-7 minutes.
  6. Season with salt to taste, and serve.
Print Friendly, PDF & Email

Peach Blueberry Banana Smoothie *

This is a ‘recipe’ for a very tasty smoothie that I discovered myself.  Smoothies don’t need a recipe, you just need complimentary flavors and enough liquid.  No pic of the actual result this time, it was so good it was gone in moments. Just imagine a purple smoothie.  No measurements needed, eyeball this one!  Play with the amounts of ingredients.  It will be fine!

INGREDIENTS:

  • 1 peach, room temp. or refrigerated, cored and sliced
  • Approximately 1/3 cup to 1/2 cup frozen blueberries
  • Approximately 1/2 cup frozen sliced bananas**
  • Approximately 1 cup 2% (or your choice of fat) milk

Make sure these fruits are safe for  you!  They are IC safe for some.

DIRECTIONS:

  1. Pour your milk into the blender.
  2. Add your peach slices, frozen blueberries, and frozen slices of bananas.
  3. Cover with lid and process until super smooth – about 45 seconds to a minute.  (We love our NutriBullet much more than traditional blenders.  It makes the ingredients pulverized into super fine bits.  Even fruit seeds are no longer annoying to eat)
  4. If the smoothie gets too thick or the blender struggles, turn off blender, and add more milk, cover, and re-process.
  5. Enjoy!!

** When your banana is too ripe or on it’s way out, take off the peel, and slice it up.  You have two choices:

1) You can be lazy like I am sometimes and throw your banana slices into a Ziplock bag and put it in the freezer.  This works better for bananas than berries.  Bananas will freeze and clump together but they’re still seperate-able.  With berries, I recommend #2.

2) With berries or if you have time to freeze bananas the right way: slice your bananas and lay them on a parchment paper or aluminum foil-lined plate, making sure they don’t touch.  Freeze them for a few hours (1-2 hours).  Then take them off the plate and put them in a freezer bag, and label.  Initially freezing them separately keeps them from becoming a massive berry lump!  I’ve been there and learned the difficult way. LOL

Print Friendly, PDF & Email