Decadent-Tasting, Light Fettuccine Alfredo *

P1080305 P1080307 P1080308

This is a killer recipe for Fettuccine Alfredo!  I found it via a Cooking Light recipe.  It’s on the lighter side.  As we all know, Fettuccine Alfredo is really mouth-watering but can be a full day’s worth of calories if you’re not concerned about portion control or ingredients.  This was a wonderful balance of creaminess and fat content versus calories.  We will make this regularly!
Don’t substitute the official Parmigiano-Reggiano cheese!  It’s expensive but makes the dish!

Note: Best eaten that day as the pasta sucks up the sauce within hours.  


INGREDIENTS:

  • 1 tablespoon butter (next time I will use 1.5-2 T.; it needed a little more butter).
  • 2 small garlic cloves, minced
  • 1 tablespoon all-purpose flour
  • 1 1/3 cups 2% milk
  • 1 1/4 cups (5 oz.) grated fresh Parmigiano-Reggiano cheese, divided
  • 2 tablespoons 1/3-less-fat Neufchatel cream cheese – (I used 3 tablespoons)
  • 1/2 tsp. salt
  • 4 cups hot cooked fettuccine (8 oz. uncooked pasta)
  • 2 tsp. chopped fresh flat-leaf parsley

DIRECTIONS:

  1. Melt butter in a medium saucepan over medium heat.
  2. Add garlic; cook 1 minute, stirring frequently.
  3. Stir in flour.
  4. Gradually add milk, stirring with a whisk.
  5. Cook 6 minutes or until mixture thickens, stirring constantly.
  6. Add 1 cup Parmigiano-Reggiano, cream cheese, and salt, stirring with a whisk until cheeses melt.
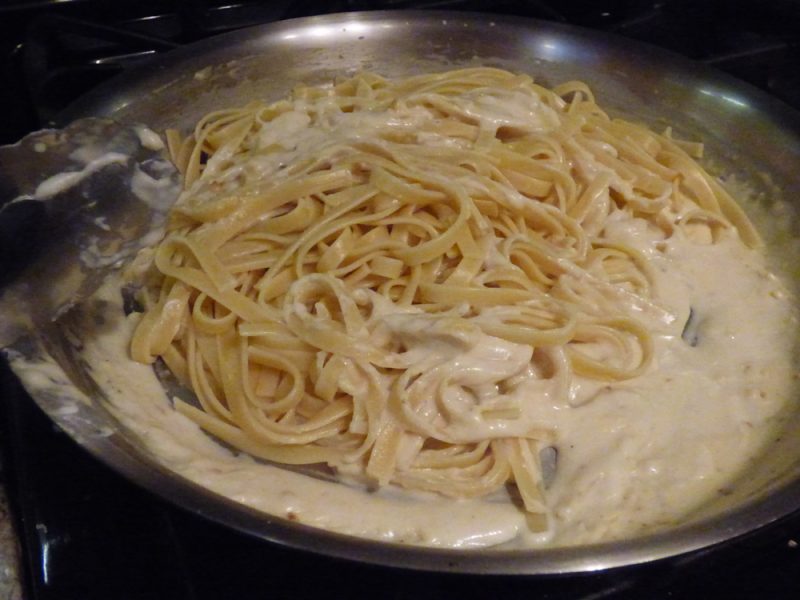
  7. Toss sauce with hot pasta.
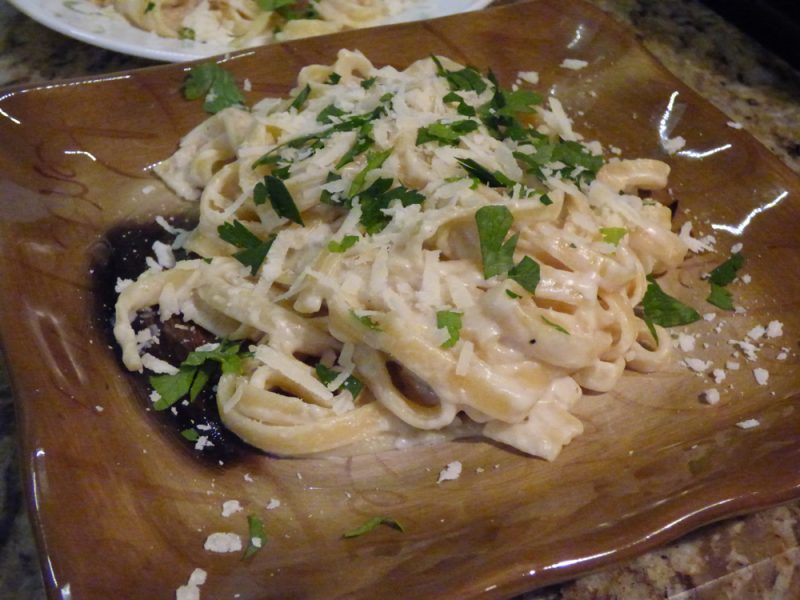
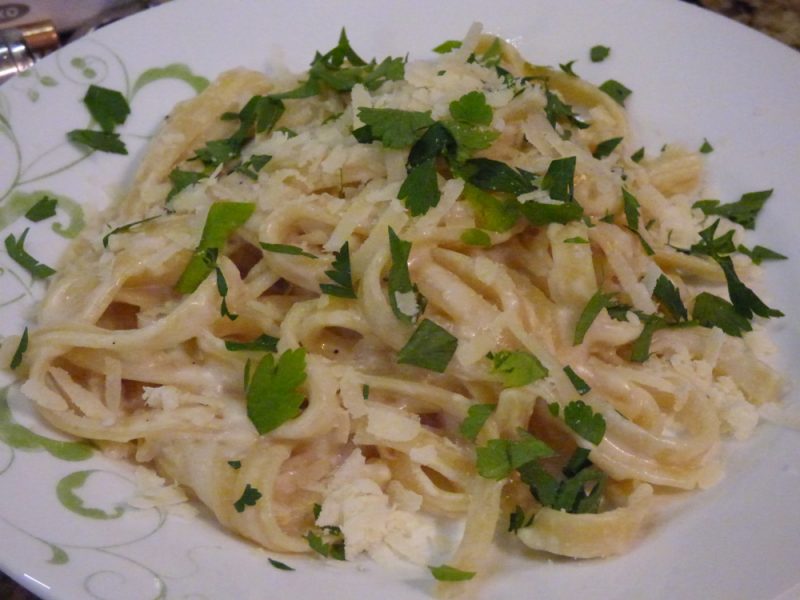
  8. Sprinkle with remaining 1/4 cup Parmigiano-Reggiano cheese and chopped parsley.
  9. Garnish with more chopped fresh parsley, if desired. Serve immediately.
Print Friendly, PDF & Email

Avocado & Buttermilk Salad Dressing or Veggie Dip *

20130707_104612_small

This is a fantastic creamy avocado dressing or dip!  It is very simple to throw together thanks to my food processor.  Possibly by using a probiotic yogurt, by some magic, it stayed as green as the photo for a week.  Though, I’d only eat it probably the first 4 days to be safe.  I’m pretty sure I cut the garlic in half.  The fresh parsley is from our garden.  It is extremely good, has healthy fats, and not as fattening as other dressings.  One recipe amount is shown in the photo, not doubled.  Highly recommended!   

20130707_103949_small

INGREDIENTS:

  • 1 avocado halved, seeded and diced
  • 1 cup buttermilk or yogurt
  • 3 T. fresh parsley
  • 2 cloves garlic, peeled
  • 1/2 tsp dry mustard*
  • 1/2 tsp onion powder*
  • Salt

NOTES: I’d omit the dry mustard to make it IC safe.  Also onions are a known irritant, so please tread with caution. I can tolerate a little onion powder, personally (for now).

Directions:

  1. To make the dressing, place the avocado, buttermilk, garlic, and seasonings in a blender or food processor.
  2. Blend and your dressing is ready.
Print Friendly, PDF & Email

A Safe-for-IC Sample Meal: Chicken Burgers, Brown Rice, Sugar Snap Peas

Here’s a new series for my IC blog: the sample meal.  Here we have homemade, plain chicken burgers with a piece of plain bacon on top, sugar snap peas with butter, and plain brown rice that was made with safe chicken stock (without soy or other irritant ingredients), salt, and butter.

The chicken burger/patty recipe:

INGREDIENTS:

  • 1 lb. ground chicken*
  • a few dashes of coarse salt
  • Daisy pure sour cream, about 2-3 Tbsp.
  • finely chopped parsley, optional, if tolerated
  • a few tablespoons Panko crumbs, optional, if tolerated

NOTES: * My bladder is so bad now I can’t buy ground chicken in the normal, pre-packed meat section. I looked at the ingredients of the Perdue ground chicken and it actually had vinegar in it, a known IC irritant.  Are you kidding me?  I had to go to Mariano’s fresh meat section and ask the worker if it was 100% plain ground chicken, and she said yes.

In a perfect world, I’d add Panko crumbs to this recipe but I am not 100% if I can tolerate them yet.   

DIRECTIONS:  

  1. Preheat oven to 375*, or pre-heat your grill.
  2. Using your clean hands, mix the ground chicken, salt, Panko crumbs, and the sour cream in a bowl. Add optional finely chopped parsley to mix, if tolerated.
  3. It will be quite sticky.  Form into small burger patties.  Lightly push down the center of the burgers so they do not become a domed burger.
  4. Either use the grill or stovetop/oven combo:
  5. If using the grill, cook until it’s safe to eat.
  6. If using the stovetop, heat pan to medium heat.  Lightly spray some PAM, or drizzle some olive oil in your pan. Once pan is hot, gently place your chicken patties on the pan and brown on each side. Then finish in oven to thoroughly cook the insides, until they’re safe to eat.
  7. Allow the meat to rest, serve.
Print Friendly, PDF & Email

Copycat Panera Broccoli Cheddar Soup *


This is a must!  This soup actually has a lot of flavor and you will enjoy it!  Give it a try!  I added potatoes for extra flavor and bulk – it turned out to be a good decision!


INGREDIENTS:

*Onion and chicken stock can be irritating to a sensitive bladder. I use the least amount of onion possible and I make sure I’m either using homemade chicken stock or organic high quality chicken stock that doesn’t include soy or other irritant ingredients.    

DIRECTIONS:

  1. Melt 1 tablespoon butter in a skillet over medium-high heat. Saute onion in hot butter until translucent, about 5 minutes. Set aside.
  2. Whisk 1/4 cup melted butter and flour together in a large saucepan over medium-low heat; cook until flour loses it’s granular texture, adding 1 to 2 tablespoons of milk if necessary to keep the flour from burning, 3 to 4 minutes.
  3. Gradually pour milk into flour mixture while whisking constantly. Stir chicken stock into milk mixture. Bring to a simmer; cook until flour taste is gone and mixture is thickened, about 20 minutes. Add broccoli, carrots, sauteed onion, and celery, (add optional potatoes here!); simmer until vegetables are tender, about 20 minutes.
  4. Stir Cheddar cheese into vegetable mixture until cheese melts. Season with salt if desired. 
Print Friendly, PDF & Email

Eggless Cheesecake *

 cheesecake

I’ve been making this eggless cheesecake for over a decade.  It’s creamy, delicious, and shockingly eggless.  This is a recipe you really need to make sure you make without distractions.  Put the child(ren) to bed, get the pets out of the room, quiet your phone, don’t check texts, turn off the TV, and focus on the measurements, because they aren’t the normal amounts used in other baking recipes, and this recipe is intermediate to advanced in skill.  One time with my son in the room, I added the entire can of sweetened condensed milk instead of 1/2 cup, it puffed up too high and was ruined.  So please pay attention.  This recipe is worth it.  If you have citrus or I.C. issues like me, definitely play it safe and omit the two lemon ingredients, but it’s sadly so much better with them!  Enjoy!

Baking Knowledge level: Intermediate to advanced.

INGREDIENTS:

  • Graham crackers to make the crust or buy a pre-made crust.
  • Four 8 oz. bars regular or Neufchâtel cream cheese, room temperature (I do a mixture of 2 regular bars and 2 reduced fat bars)
  • 1/2 cup sweetened condensed milk (Approximately half of a standard 14 oz. can, but measure it!)*
  • 1/2 cup sugar
  • 1/4 tsp. baking soda
  • 2 tsp. baking powder
  • 1/4 cup cornstarch
  • 1 T. pure 100% vanilla extract^^
  • 1 cup sour cream *

Notes:

** You can make the crust yourself, or buy pre-made, but please make sure your graham crackers or crust is safe, some have cinnamon, which is an irritant to some!  Cinnamon irritates me.

*Buy the most simple sweetened condensed milk  and sour cream you can – the less ingredients the better! I only buy Daisy brand sour cream. 

OMIT the 1 T. lemon juice and the 1/2 tsp. grated lemon rind, because they are common irritants.

^^Some people like me have problems with vanilla extract, so I omit it, and I have far less pain.


Necessary Tools:

  • A SPRINGFORM PAN like this, don’t use anything else
  • A jelly roll pan for underneath the springform pan
  • Aluminum foil


DIRECTIONS:

To make your own graham cracker crust:

  1. Make sure your springform pan’s latch is closed.  Read the directions for your pan before beginning.
  2. Using aluminum foil, cover the outside of your springform pan to prevent leaks.  Bring aluminum foil up 1″ around the sides of the pan and make an aluminum foil barricade just in case of a small leak.  Then place your springform pan (with foil around the bottom outside of it) onto a jelly roll pan to ensure if it leaks, even though it shouldn’t, you don’t have a large oven mess to clean up.  Set aside.
  3. Note: If your pan ends up leaking after baking, try to rescue your cheesecake and throw out the pan.  Life is too short for junky & frustrating bakeware.  Treat yourself to a new leakproof pan on Amazon or where ever you prefer to buy it.
  4. Crush or food process enough chocolate or honey graham crackers to make about 1/2″ medium size crumbs on the bottom of your Springform pan.  Melt approximately 2-3 tablespoons of unsalted butter, let cool slightly.  Using your clean fingers, combine the graham cracker crumbs with the cooled melted butter in the bottom of your un-greased 9″ springform pan.
  5.   Pat graham cracker and butter mixture and tamp down until the entire bottom of the springform pan is covered in crumbs and compacted as best you can.
  6. Now set aside and finish your cheesecake filling below.

To make the cheesecake:

  1. Preheat oven to 300 degrees F.
  2. In a large bowl with a handheld mixer, or in your stand mixer, beat everything except sour cream until smooth approximately 3 minutes.
  3. Add sour cream and blend well.
  4. Pour batter into prepared pan (foil on outside bottom, with graham/butter crust on the bottom of the pan).
  5. Bake for approximately 1 hour on center rack.  Thin knife inserted into outside of cake should come out clean when cake is done.  If it doesn’t, I usually add 10 minutes and re-test.  Middle of cake will still be creamy.
  6. Turn off oven and open oven door.  Let cake sit in oven for another 2-3 hours to cool slowly.  (DON’T SKIP THIS STEP!)
  7. Remove pan from oven after it has cooled.  Loosen sides of pan with knife.  Unlatch your Springform pan to open it up and remove sides.
  8. Place cake, still on thin metal pan base, on a cooling rack.  Allow to cool completely at room temperature before placing in fridge.  Lightly cover with plastic wrap if needed (monitor condensation).
  9. Refrigerate a few hours before serving.
Print Friendly, PDF & Email

Whole Wheat Apple Muffins *


I’ve been making this recipe since 2014!

This recipe is from “Smitten Kitchen” – and we found it really healthy YET wonderful.  Sometimes, as we all know, healthy baked goods can be very unappetizing, but these had flavor, sweetness, with a unique apple taste.   I got about a 18-19 muffins yield.  They freeze and defrost well.  I left them on the counter to defrost, or in a pinch, I defrosted them on the defrost setting of my microwave.  I’ve used buttermilk one time, and recently (2017) I used 2% Greek Yogurt, both work well but I prefer the Greek Yogurt (or use any regular yogurt).  🙂   ENJOY!

—You can make these eggless by obviously removing the egg – no substitution needed. The buttermilk or yogurt makes up for it.—

Smitten Kitchen Link!

INGREDIENTS:

1 cup (4 ounces) whole wheat flour
1 cup (4 1/4 ounces) all-purpose flour
1 teaspoon baking powder
1 teaspoon baking soda
1/4 teaspoon salt
1 tablespoon cinnamon** 
1/2 cup (1 stick, 4 ounces) unsalted butter, at room temperature
1/2 cup (3 1/2 ounces) granulated sugar
1/2 cup dark brown sugar, packed, divided
1 large egg, lightly beaten (*eggless tip, if you need it)
1 cup (8 ounces) buttermilk or yogurt**
2 large apples, peeled, cored, and coarsely chopped


**(cinnamon is not I.C. safe for me, so I omit it)

*IF YOU NEED TO MAKE THEM EGGLESS, I JUST TOOK OUT THE EGG BECAUSE THERE IS BUTTERMILK OR YOGURT IN THE RECIPE TO MAKE UP FOR IT). 

**We used 2% Fage Greek Yogurt and it turned out wonderful. – December 2017.

  1. Preheat the oven to 450°F. Grease and flour 18 muffin cups and set aside.
  2. Mix together the flours, baking powder, baking soda, salt, and cinnamon, and set aside.
  3. In a separate bowl, cream the butter and add the granulated sugar and 1/4 cup of the brown sugar. Beat until fluffy.
  4. If using eggs, add the egg and mix well; stop once to scrape the sides and bottom of the bowl.
  5. Mix in the buttermilk/yogurt gently. (If you over-mix, the buttermilk will cause the mixture to curdle.)
  6. Stir buttermilk/yogurt mixture into the dry ingredients and fold in the apple chunks.
  7. Divide the batter evenly among the prepared muffin cups, sprinkling the remaining 1/4 cup brown sugar on top.
  8. Bake for 10 minutes, turn the heat down to 400°F, and bake for an additional 5 to 10 minutes, or until a toothpick inserted into the center of a muffin comes out clean.
  9. Cool the muffins for 5 minutes in the tin, then turn them out onto a wire rack to cool completely.
Print Friendly, PDF & Email

Almost Mexican Salad *

INGREDIENTS:

  • Green leaf lettuce or romaine, rinsed and dried
  • avocado, freshly sliced
  • black beans or Northern/white beans, low sodium, plain, rinsed and drained**
  • plain corn chips (not seasoned, not spicy) or plain toasted corn tortillas
  • flank steak or comparable steak
  • salt, onion powder and/or garlic powder, if desired
  • cilantro, rinsed and dry*
  • PLAIN Chihuahua cheese, Gouda, shredded cheddar, or whatever cheese you love that’s safe

** Black beans are on the try it list, so I highly suggest subbing with Northern beans or any white beans to play it safe.

*Cilantro is irritating to me, so I skip it, as awesome as it is! 🙁

—> OMIT: Limes/citrus, bottled dressing, tomato, spicy seasonings, pico de gallo, guacamole because it’s usually prepared with lime, anything acidic, and also avoid spicy cheese like spicy chihuahua cheese.


DIRECTIONS:

  1. Season with flank steak with salt and onion/garlic powder, if desired.
  2. Grill your flank steak for best results.
  3. Make a bed of your clean and dry lettuce, chopped into bite size pieces.
  4. Add your sliced cheese, beans, chopped cilantro (if tolerable), sliced avocado, corn chips.
  5. If you need a dressing, I have found that bottled dressings are entirely unsafe especially with the preservatives and citric acid!  I use olive oil and honey and never have had a problem.  
  6. Enjoy!


Print Friendly, PDF & Email

Naan Pizza with Fresh Mozzarella and Basil – A Simple Delight Without Tomato! *

So, I think we all can agree it’s absolutely a knife in the back not to be able to eat typical pizza when you have I.C.  Don’t get me started on how much I miss an occasional pizza slice of thin or deep dish.  Just think about it makes me hangry.  (Hungry and angry at IC).  Losing tomato and chocolate were the worst losses for me, personally.  Anyway, here is my creation where I found a work around to the typical tomato pizza, and what’s even better?  It’s fast.


Serving: 1 Naan pizza can serve one hungry person or 2 moderately hungry people.

INGREDIENTS:

  • A package of Naan flatbread
  • 1-2 teaspoons extra virgin olive oil (depending on your preference)
  • coarse salt
  • a ball of fresh mozzarella in a plastic package
  • additional shredded mozzarella cheese if needed
  • fresh basil – or dried if that’s all you have

DIRECTIONS: 

  • Preheat oven to 400 degrees to get it piping hot.
  • Remove one Naan oval from package.
  • Spread with a reasonable amount of olive oil – just enough to cover the top without making it a soppy mess.  Start with 1 teaspoon of olive oil and see if you need more, you probably won’t.
  • Slice your mozzarella round into thin pieces.  Cover the top of the olive oil’ed naan with mozzarella pieces.  You will not need the entire ball’s worth of cheese.  (Usually I use about 1/4 of the large 8 oz. mozzarella ball per pizza, give or take.)
  • Cover with additional shredded mozzarella, if desired.
  • Place fresh basil on top of pizza.
  • Take 1-2 small pinches of coarse salt and spread over pizza.
  • Move pizza to a baking sheet, once pre-heated, bake pizza for 10-15 minutes.  Monitor pizza’s doneness at 10 minutes.
Print Friendly, PDF & Email

Blueberry Maple Bran Muffins -Healthy Yet Delicious *


This is a healthier awesome muffin I found on the Once Upon A Chef website.  Here’s the original (non IC safe) link: OUAC: Blueberry Maple Bran Muffins.  I had to omit the cinnamon as it’s a common bladder flare.  This recipe is just perfect.  It has whole wheat flour, wheat germ/bran, adds pure maple syrup as a sweetener, and has fresh blueberries.  Also, it’s still tasty!  It made about 16-17 muffins for me, not the stated 14.  A+!


You can control the “heathfullness” of the recipe.  In total it requires 2 cups of flour.  

#1 — If you want this recipe very healthy, follow the recipe: 1 1/4 cup all purpose + 3/4 cup whole wheat flour.

#2 — If you want it moderately healthy, I would do 1 1/2 cups all purpose + 1/2 cup whole wheat flour.  

#3 — If you want it just a little healthy and more typical tasting, I would do 1 3/4 cups all purpose flour + 1/4 cup whole wheat flour.  

If you are unsure, I would try the mid-range method of #2.  


Remember: never substitute fake sweetener in your baked goods – for many, including me – it’s a horrible I.C. flare ingredient!  I’d be out of commission two days if I had fake sweetener in any amount.  


**Please make sure you can tolerate blueberries first, they are on the safe list, but it really depends on the person.

INGREDIENTS:

  • 1-1/4 cups all-purpose flour, spooned into measuring cup and leveled-off with back edge of knife
  • 3/4 cup whole wheat flour, spooned into measuring cup and leveled-off with back edge of knife
  • 1/2 cup wheat bran or wheat germ
  • 1 teaspoon baking powder
  • 1/2 teaspoon baking soda
  • 1/2 teaspoon salt
  • 2 large eggs
  • 1/3 cup pure maple syrup
  • 1/2 cup plus 3 tablespoons sugar
  • 1/2 cup canola oil (or other vegetable oil)
  • 1-1/2 cups low-fat milk (I used 2%)
  • 1 cup fresh blueberries, plus all-purpose flour for coating

DIRECTIONS:

  1. Preheat oven to 400 degrees. Grease two standard 12-cup muffin tins with non-stick cooking spray (the recipe makes 14 muffins, so 7 in each pan).
  2. In a large bowl, whisk together the flours, wheat bran, baking powder, baking soda, salt and cinnamon.
  3. In another bowl, beat together the eggs, maple syrup, sugar, oil and milk. Whisk the egg mixture into the flour mixture until batter is smooth (note: batter will be very wet).
  4. Rinse the blueberries and toss them in a small bowl with 2 teaspoons flour until they are well-coated (they need to be wet in order for the flour to stick). Using a ladle or half-cup measure, scoop the batter into the muffin cups until they are about three-quarters full. Using your hands, evenly distribute the berries into the muffins, pressing them just beneath the surface of the batter (about 5 berries per muffin). If you leave them showing, they will create holes in the muffins. Carefully fill the empty cups in each muffin tin half-way with water.
  5. Bake for 20-25 minutes, rotating pans midway through, until golden brown and crisp around the edges. Cool in the pan for 5 minutes, then turn muffins out onto wire rack. Serve warm. Store leftover muffins in an airtight container and reheat before serving. (To reheat, wrap muffins in aluminum foil and place in 400 degree oven for 10-15 minutes.)


Print Friendly, PDF & Email

Simple 4 Ingredient Raspberry/Banana/Blueberry Smoothie – I.C. Safe For Some! *

Here’s a quick and easy smoothie that is IC safe! for some IC patients.  I throw all the ingredients in my Ninja Blender and put it on Intelligent IQ setting and it does all the work.  All your ingredients besides the milk are frozen, so the  key is adding enough liquid otherwise it’ll just jam up the machine. I’ve made this countless times.
For the members of your family that don’t have IC, if you add frozen strawberries it turns out wonderful too.

-Do NOT add any sugar, it doesn’t need it.  
-Do NOT add fake sweetener, even Stevia – it is a major IC bladder irritant!  

NOTE: Amounts are estimated.  The measurements below are approximate and are meant to make 1 to 1.5 smoothie servings. Play with the amounts to find your suitable smoothie.  If you dislike one the ingredients, just skip it.  It doesn’t require three fruits.  Two fruits would taste the best I think, but even one would work!

3/2018: I can no longer tolerate bananas/raspberries but I will keep this recipe up for all of you who can.

INGREDIENTS:

  • frozen bananas (about 1/3 cup) – I pre-slice bananas and freeze then in baggies for smoothies.
  • frozen blueberries (about 1/4 cup)
  • frozen raspberries (about 1/3 cup)
  • 1 cup of 2% milk

DIRECTIONS:

  1. Put all ingredients into your blender, no specific order is necessary.
  2. Make sure you add enough milk otherwise the machine will jam and will have to work too hard due to all the frozen ingredients.  Add additional milk as needed to allow the machine to whip it up easily.
  3. Blend for 45 seconds to 1 minute to reach a smooth consistency.
Print Friendly, PDF & Email