Cookbook Organization -Post-it Notes & Tabs Trick!

So, if you have many awesome cookbooks like me (i.e. too many, but you use them all, so there!), you need to keep things organized.  There’s nothing worse than having the perfect soup recipe for an occasion and not knowing which cookbook it’s in!  And then having to waste your time Googling for 30 minutes…

And yes, to make this work you need to invest in tabs.  For the best prices check Amazon. I know, I buy a plethora of  tabs because I love them and they don’t re-stick that well.
So, I started doing this organizational hack for cookbooks and realized it may help others.

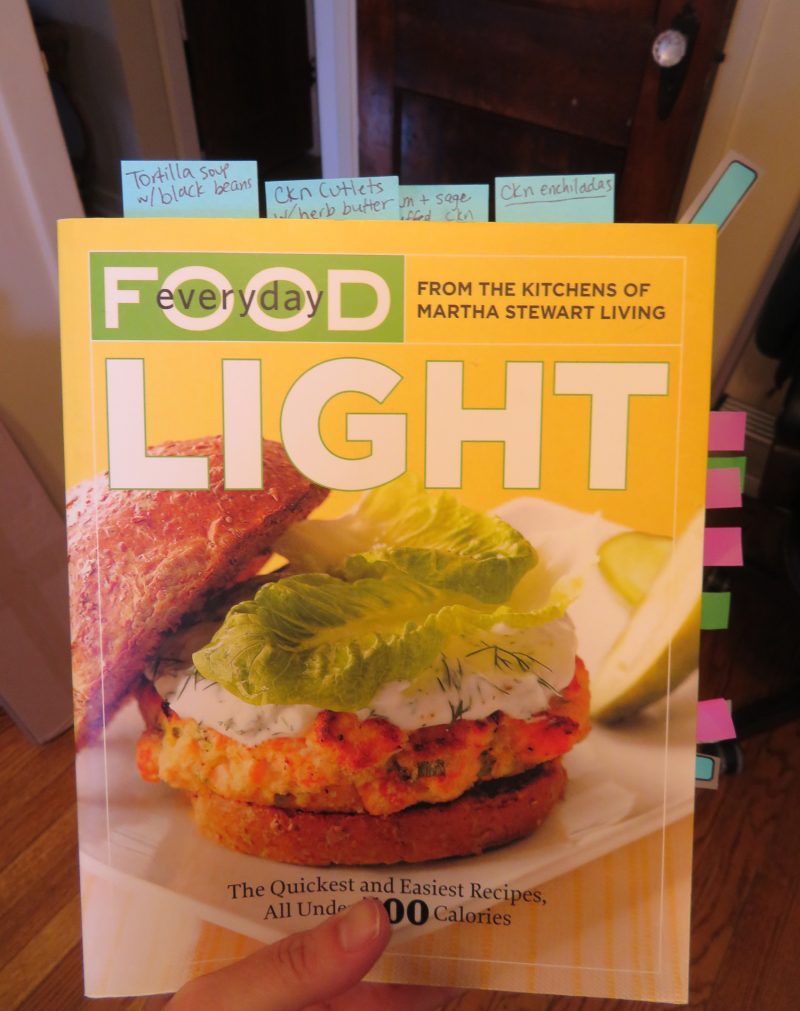
1) “MUST KEEP THIS AND MAKE AGAIN” TABS:  The large top tabs are made of 3×3″ post-it notes cut in half.  I make sure to put them on the right side page of the cookbook so you can see the labeled tabs from the front.

2) “RECIPE TO TRY IMMEDIATELY” TABS:  The tab sticking out at the top right of the cookbook, diagonally, is only for recipes I plan to make very soon.  For instance, I will go to the grocery store, come back, and lose my recipe unless I do this!  It saves time!  You could even Sharpie label this tab with the recipe name, if you had multiple “recipes to try immediately” tabs.

3) “NEED TO TRY LATER” TABS:  The tabs sticking out on the right side are tabs labeling recipes I want to make in the future.

So, if a side tab becomes a “must make again” recipe (because I made the recipe and it is a knockout!), then I take the time to make a labeled TOP tab with the name of the recipe for easy access.

Hopefully this helps someone in internet land who loves to cook…

Homemade Vanilla Extract

vanilla1 vanilla2 vanilla3 vanilla4 vanilla5

Homemade vanilla extract is something I never thought I’d make, but I am so glad I gave it a try.  I will definitely be making this again too.  With a little bottle of pure vanilla extract costing $5-10+, and with the possibility of the manufacturer putting unfortunate and fake ingredients in your vanilla, it’s a wise choice to make it yourself.  Also, it was simply fun to monitor it over the few weeks to watch (and smell) it morph from a vanilla bean inside a jar of vodka into vanilla extract.  The smell is heavenly!

Use this extract as a 1:1 replacement for store-bought extract.  This makes a great deal of vanilla extract!

For the best, most affordable deals on vanilla beans, head to Amazon or an online seller.  In the store, it’s a complete ripoff and will be a fun experiment but won’t save money.  In the store I’ve seen them ask $8 for one bean in a glass jar.  So, definitely buy online!


INGREDIENTS:

  • 2 vanilla beans
  • one 375-milliliter bottle of mid-grade vodka


DIRECTIONS:

  1. Using a sharp knife, split each vanilla bean in half down the middle.
  2. Add the sliced beans to the vodka bottle.
  3. Secure the lid and store the jar in your pantry for a couple of weeks, until the liquid starts to turn brown, then it’s ready to use.  (For me, this was about 6 weeks, give or take).


I found a bigger bottle of vodka and measured out the 375mL amount into a Mason jar and proceeded from there.  


Grilling Tip

IMG_20130313small

Do you know why this photo looks so scrumptious?  I was lucky enough to get perfect lighting, sure, and the colors of the food just are pretty, and the rice pilaf matches the granite, BUT….do you notice that the B.S. (boneless skinless) chicken breast is grilled to perfection?  There are a lot of tools and appliances out there where it doesn’t matter what brand you have, but after owning an expensive WEBER grill, our food always turns out perfectly the first time.  When we first got it, we commented on how the chicken could be cooked to safety standards but also be JUICY?  Was that possible?  Our old Charbroil looked good and looked expensive, but that didn’t matter because the final product was often burnt, dried out, and not so perfectly grilled.  The old Charbroil looked expensive but it was hiding behind its stainless steel and black facade.  In about three years, it was garbage and everything on it had fallen apart and the grates completely disintegrated.  I was lucky for someone to pick it up off Craigslist for mere pennies of what we paid.  Don’t be fooled by Charbroil. 

My husband was very good at grilling but it didn’t matter because of the inferior tool he was using – the Charbroil!  I urge you to reconsider buying charbroil and put that $120-400 towards a grill that has been known to keep on working for decades – a WEBER, no matter if it’s Weber’s inexpensive end or their high end.  And parts are easier to find with Weber, not so much with Charbroil! 

Sometimes, the issue that keeps  you from that wonderfully prepared food is price.  Here’s our Weber Genesis E-310 propane grill, Made in the U.S.A.  Obviously ours wasn’t cheap, but this is one of those purchases where money doesn’t matter to us because the end result is perfection and we will get many, many years out of it.  I highly recommend this grill, or any Weber grill.  Weber has many price points!  We own it’s inexpensive brother (usually in the $50’s-$60’s) and it’s performed beautifully as well – a Weber 1520 Gas Go-Anywhere Grill.