Homemade Greek Dressing * (Not IC Safe)

Greek-dressing-3-16-14

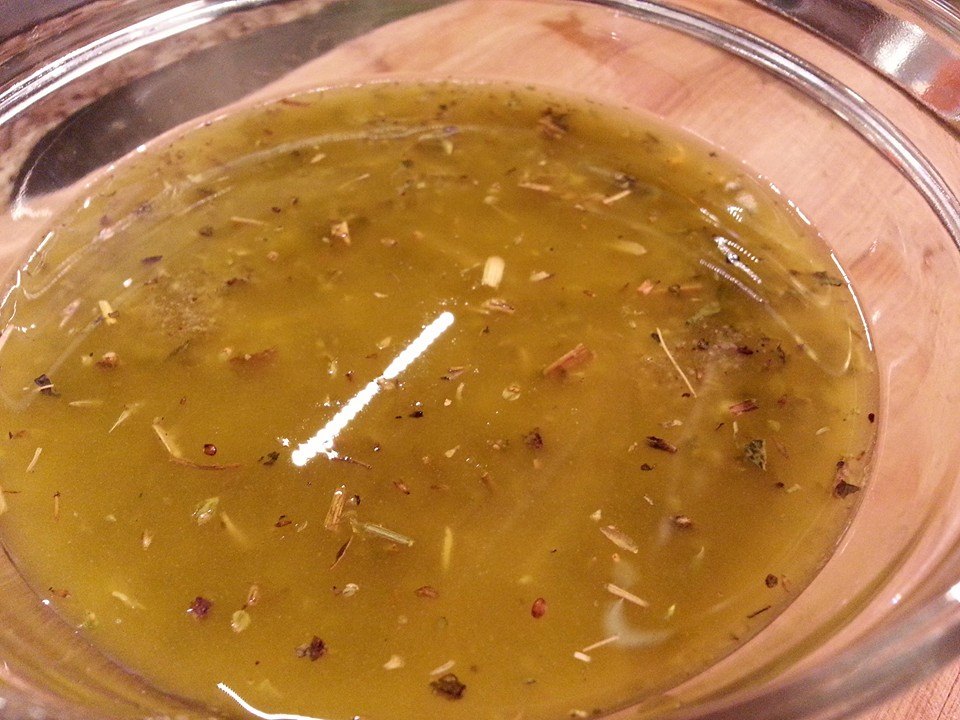
In an ongoing effort to save money on groceries (haha, what a good joke), I rented a book from the library entitled, “Family Feasts for $75 Per Week: A Penny-wise Mom Shares Her Recipe for Cutting Hundreds from Your Monthly Food Bill” by Mary Ostyn.  I copied a few pages, one of which was “Greek Dressing” page 267.  It was super easy to put together and did not involve a food processor, just shaking.  *Most salad dressings with a high vinegar content will easily last in the fridge 2 months, but sniff it each time.  You can always halve this.  I poured the mixture into my Ball brand Mason jar when I was done mixing.  A+ authentic flavor!

INGREDIENTS:

  • 1/2 cup olive oil
  • 1/4 cup water
  • 1 T. Dijon mustard**
  • 1 T. sugar
  • 1 1/2 tsp. garlic powder
  • 1 tsp. dried oregano
  • 1 tsp. dried basil
  • 1 tsp. black pepper (freshly ground is best)**
  • 1 tsp. salt
  • 1 tsp. onion powder**
  • 2 cloves garlic, minced (I omitted this one, or you can add more garlic powder)
  • 1/2 cup red wine vinegar**

DIRECTIONS:

  1. Combine all ingredients in a pint-size container with a tight-fitting lid.  Shake well.
  2. Store, tightly covered, in fridge up to 2 months. 


Print Friendly, PDF & Email

Kit Kat and M&M Candy Cake * (Not IC Safe)


20140307_120511small

SAMSUNG CAMERA PICTURES

Yes, when I checked out at the register I worried if they thought I was actually eating all this candy by myself. 🙂

SAMSUNG CAMERA PICTURES

I pre-chilled my Kit Kat bars in the fridge so handling them would not bring on melting. 

Never frost a warm cake!

I used my new Wilton cake turntable here and it was extremely handy.  I used an offset spatula to frost the cake and prior to frosting I put down wax paper that was taped on underneath the turntable.  Once the cake set in the fridge a few hours, I removed the wax paper and tape to reveal a clean edge!  

SAMSUNG CAMERA PICTURES

SAMSUNG CAMERA PICTURES

1724405_10203477335283745_250935993_n

 I found this recipe at NOSHWITHME.COM.  It was a perfect addition to our birthday parties.  It was fun, delicious, and very attractive.  Also, it was easy, which is great when you need a break from piping.  You can use any colored 2-layer cake, but it’s preferable to use chocolate frosting so the frosting doesn’t show through the Kit Kats, believe me.  

INGREDIENTS:

  • Two 8″ or 9″ cakes, any flavor  (I used an eggless wacky cake recipe).
  • Chocolate frosting (enough for a 2-layer cake)
  • One 12.60 ounce bag of M&Ms (or any candy you want to top it with)
  • 11-12 full size (not snack size) packages Kit Kats (I bought 5 “XL” Kit Kat bars and barely had any leftover.)

Preparation

  1. Bake cakes and let cool at least an hour, or until room temperature.
  2. Using a cake leveler or serrated knife, level cakes so the tops are no longer domed. (If you are using a serrated knife, it helps to freeze the cake first.)
  3. Separate each Kit Kat so you have sections of two Kit Kats.  The original author put them in the fridge first so they wouldn’t melt while I was handling them.  I personally think you could also split up all the Kit Kats and not even leave 2-Kit Kat sections, I will try that next time. 
  4. Frost the top of one cake, then place the second cake on top of it. Frost the top of the second cake and the sides of the stacked cakes.
  5. Place the Kit Kats around the frosted cake, as close together as possible.
  6. You can also tie a ribbon around the cake to keep the Kit Kats from moving. Pour the M&Ms on the top of the cake. Slice and serve!


Print Friendly, PDF & Email

Simple & Healthy Flatbread or Tortilla Wrap * (Not IC Safe)

tortilla-wrap

If you’re looking for a quick and healthy meal, I have one for you – and I promise it’s easy!

INGREDIENTS:

  • 1 piece Tortilla or high-fiber Flat Out flatbread
  • (Here’s the one I used Light Sundried Tomato flatbread**
  • Light Mayonnaise or Light Italian /Caesar Dressing**
  • Lettuce, washed and dried, I used red leaf lettuce
  • Thinly sliced ham
  • Thinly sliced cheese
  • Freshly ground pepper and optional spices**

**Known IC irritants, tread carefully!

DIRECTIONS:

  1. Lay tortilla or flatbread on a cutting board.
  2. Spread a small amount of mayo or light Italian or Caesar dressing on wrap.
  3. Put lettuce on wrap, and then layer ham and cheese.  Add other optional toppings that you choose: tomato, cucumber, etc, but keep the bulk down as it will be difficult to cut into.
  4. Top with freshly ground pepper or spices. 
  5. Roll tightly, while holding firmly, cut down the middle so you end up with two cross-sections of your wrap. 
  6. Enjoy!
Print Friendly, PDF & Email

Stuffed Pepper Soup

Stuffed Pepper Soup Angie

We really love this savory recipe!  It’s basically everything that’s great about stuffed pepper soup with less work.  The original recipe called for 2 cups raw rice, but after making this recipe with 1 cup raw rice, you will find it is more than enough!  ENJOY!

Serve 6
398 cals 5.6g fat (1.9g saturated) (without cheese)

INGREDIENTS:

  • 1lb LEAN ground beef
  • 1 lg onion, diced (WE USED ONION POWDER)
  • 1 cup white or wild rice
  • 1 14.5 oz. can Hunts flavored diced tomatoes (Red pepper and fennel, roasted garlic, sweet onion etc) (I USED PLAIN JUST FINE)
  • 1 can tomato sauce (14.5oz can)
  • 1 tsp dried oregano
  • 1 tsp dried basil
  • ½ tsp salt
  • ¼ tsp pepper
  • 1 box chicken stock (32oz)
  • 2 cups water
  • 2 tbsp powdered beef stock
  • 3 bell peppers, any color
  • Cheese for topping (optional)
  • Fresh cracked black pepper for garnish (optional)

DIRECTIONS:

  1. In a large soup pot coated with cooking spray, over medium-high heat, brown the grown beef with the onions and rice. I know that sounds odd, but browning the rice gives it a nice nutty flavor – do not allow it to burn!
  2. Meanwhile dice your peppers into small ½” pieces, set side.
  3. Add in the diced tomatoes, tomato sauce, oregano, basil, salt, pepper, chicken stock, water, and powdered beef stock, then allow it to come to a boil.
  4. Reduce heat, cover and allow it to cook 20 minutes then add the peppers and allow it to cook another 20-30 minutes (some types of rice may need longer cooking times).
  5. Serve with cheese on top (optional).
Print Friendly, PDF & Email

Black Bean Vegetable Soup * (Not IC Safe)

20140311_181539


This is a really tasty black bean soup that is vegetarian.  It is healthy and hearty but it’s on the lighter side since it doesn’t have meat.  My husband and I love it!  I used green onions and garlic powder.  Plain or topped with sour cream and cilantro works well too! Enjoy!

INGREDIENTS:

  • 1 tablespoon vegetable oil
  • 1 onion, chopped (ONION POWDER IS FINE, OR GREEN ONIONS)**
  • 1 clove garlic, minced (GARLIC POWDER IS FINE)
  • (You can add other veggies like celery and green pepper like I have and it works wonderfully).
  • 2 carrots, chopped
  • 2 teaspoons chili powder**
  • 1 teaspoon ground cumin (I USED 1/2 TSP)**
  • 4 cups vegetable stock
  • 2 (15 ounce) cans black beans, rinsed and drained (I USED LOW SODIUM)**
  • 1 (8.75 ounce) can whole kernel corn
  • 1/4 teaspoon ground black pepper**
  • 1 (14.5 ounce) can stewed tomatoes**

**Known IC irritants, tread carefully!

DIRECTIONS:

  1. In large saucepan, heat oil over medium heat; cook onion, garlic, and carrots, stirring occasionally, for 5 minutes or until onion is softened.
  2. Add chili powder and cumin; cook, stirring, for 1 minute. Add stock, 1 can of the beans, corn, and pepper; bring to boil.
  3. Meanwhile, in food processor or blender, puree together tomatoes and remaining can of beans; add to pot.
  4. Reduce heat, cover, and simmer for 10 to 15 minutes or until carrots are tender.
Print Friendly, PDF & Email

Orzo with Parmesan and Basil

SAMSUNG CAMERA PICTURES

Wow, sometimes it’s the most simple recipes that turn out the best.  I knew while the aroma was filling my kitchen, that this recipe would turn out beautifully.  Between the chicken stock, orzo, fresh basil, and the Parmesan, this is just wonderful!  It’s hard to stop eating it even though it does not have MSG.  This is how Rice a Roni should be done!  No preservatives and barely any more work than a boxed meal.  *If you want whole wheat orzo, they have it at certain stores.  In the past, I’ve found it at Whole Foods.  Enjoy! 

INGREDIENTS:

  • 2 tablespoons butter

  • 1 cup uncooked orzo pasta

  • 1 (14.5 ounce) can chicken broth (or homemade or from bouillon)

  • 1/2 cup grated Parmesan cheese

  • 1/4 cup chopped fresh basil

  • salt and pepper to taste

  • 2 tablespoons chopped fresh basil

DIRECTIONS:

  1. Melt butter in heavy skillet over medium-high heat. Stir in orzo and saute until lightly browned. (WATCH IT, YOU DON’T WANT TO BURN IT, JUST BROWN IT).
  2. Slowly stir in chicken stock and bring to boil. Cover. Reduce heat and simmer until orzo is tender and liquid is absorbed, about 15 – 20 minutes.
  3. Mix in Parmesan cheese and basil. Season with salt and pepper. Transfer to shallow bowl. Garnish with basil sprigs.
Print Friendly, PDF & Email

Eggless Chocolate Chip Cookies * (Not IC Safe)

SAMSUNG CAMERA PICTURES


If you need to make eggless cookies for someone, such as my husband with an egg allergy, these are the perfect ones.  Honestly, I can eat eggs and I look forward to these!  They’re just perfect to me.  I use a cookie scoop for even proportions, which will give you even baking results.  I put them on parchment paper on top of metal pans; I use AIRBAKE pans.  They freeze well too, but are best fresh. I’ve made a double batch of the recipe below and it works out great for a big crowd.  The mixer works great here to mix the butter/sugars.

INGREDIENTS:

  • 1/2 cup butter or margarine, ROOM TEMPERATURE
  • 1/3 cup white sugar
  • 1/2 cup firmly packed brown sugar
  • 1 1/2 cups flour
  • 1 tsp. baking soda
  • 1/2 T. vanilla extract
  • 3 T. vegetable or canola oil
  • 2 T. water (use up to 3 T. if it’s too dry)
  • About 5 oz. semisweet chocolate pieces (regular size chips work best)**
  • 1/4 cup chopped nuts (totally optional)

**Known IC irritants, tread carefully!

DIRECTIONS:

  1. Preheat oven to 350° F. (Use convection mode if you have it, it works well for us).
  2. In a large bowl, with a handheld mixer or a stand mixer, set on medium speed, cream butter and BOTH sugars until fluffy, about 2 minutes.
  3. Slowly mix in flour and baking soda.
  4. Add vanilla, oil, and water.  Mix until completely combined.
  5. With a spoon, fold in nuts, if used, and chocolate chips.
  6. Using a cookie scoop, drop on cookie sheets (or parchment paper on top of cookie sheets), spacing the cookies 2″ apart.
  7. Bake for 8-10 minutes, watch closely for when they turn light brown.
  8. Cool on wire racks in pans for 3 minutes (WAIT UNTIL THEY HARDEN UNTIL MOVING THEM!)
  9. Then remove with a spatula and transfer onto wire racks and cool.
Print Friendly, PDF & Email

Baked Ravioli

SAMSUNG CAMERA PICTURES

SAMSUNG CAMERA PICTURES

This is an awesome recipe that tastes as good, or better than the restaurant.  Since I have to avoid the fresh garlic and onion, I put ALL of the first seven ingredients in a pan and just started cooking, substituting onion and garlic for onion and garlic powders.  I proceeded to step 5.  It turned out just great.  A+!


INGREDIENTS:

  • 2 tablespoons olive oil
  • 1 medium onion, chopped
  • 3 garlic cloves, minced
  • coarse salt and fresh ground pepper
  • 1 1/2 teaspoons dried thyme or oregano
  • 1 can (28 oz) whole tomatoes
  • 1 can (28 oz) crushed tomatoes
  •  2 pounds ravioli (We used four cheese)
  • 1 1/2 cups shredded mozzarella
  • 1/2 cup grated aged Parmesan (in the block form or pre-shredded)

DIRECTIONS:

  1. Preheat the oven to 425° F.
  2. Heat the oil in a large saucepan over medium heat.
  3. Add the onion and garlic, and season with salt and pepper, cook, stirring occasionally, until softened, about 5 minutes.
  4. Add the thyme or oregano, and tomatoes.
  5. Bring to a boil, reduce heat, and simmer, breaking up the tomatoes with a spoon, until the sauce is thickened and reduced to about 5 1/2 cups, 20-25 minutes.
  6. Meanwhile, cook the ravioli in a large pot of boiling salted water just until they float to the top.
  7. Drain the pasta, return to pot.
  8. Toss the sauce with the pasta.  Pour the pasta into a large dish or 9×13″ baking dish, and sprinkle with the cheeses. 
  9. Bake until golden, 20-25 minutes in oven.  Cool slightly before serving. 


Print Friendly, PDF & Email

Beef Barley Soup

SAMSUNG CAMERA PICTURES

I haven’t uploaded a recipe in a while, it’s been an extremely busy few weeks of school and life.

This is a wonderful soup, it’s hearty and tasty.  It’s filling with the barley.  Feel free to add more veggies, including your favorites.  It’s actually best on day two and beyond.  In the summer, we’ve actually grilled the meat and then sliced it up and put it in the soup!

INGREDIENTS:

  • 1/2 lb. cooked shredded beef (I use peppersteak or a similar thin steak sliced up)
  • 1 medium onion diced (I use onion powder)
  • 1-2 ribs celery, diced
  • 1/2 small green bell pepper, cored and diced
  • 1 carrot, diced
  • 1 16-oz. can diced tomatoes
  • 2 bay leaves
  • 6 cups beef broth
  • 1/2 cup pearl barley (I use the slow cooking barley, not the quick one)
  • salt and pepper to taste
  • FEEL FREE TO ADD: dried oregano, pre-cooked green beans (we did!), or any other veggies, or more of the mentioned veggies!


DIRECTIONS:

  1. In a large soup pot, combine beef, onion, celery, green pepper, carrot, and tomatoes.  Cook over med-high heat, stirring constantly, 3 minutes. 
  2. Add bay leaves and broth, bring to a boil.
  3. Stir in barley, continue boiling 5 minutes.
  4. Reduce heat to medium, cover and cook 1 hour.  Stir and check liquid level frequently. 
  5. Season with salt and pepper to taste.
Print Friendly, PDF & Email

Puffed Apple Pancake *

puffy-apple-pancake

This is a wonderful breakfast treat.  I didn’t have enough Golden Del. apples on hand, even though I planned well, so I used 3T. butter instead of 4.  It turned out flavored like apple pie, mixed with an omelet, and a pancake.  It was awesome.  I suggest eating it on day 1 though, that’s when the flavor and rise was the best.  Within 30 minutes it falls to a thin height and won’t be as attractive. 

Ingredients

  • 1 cup whole milk
  • 4 large eggs
  • 3 tablespoons sugar
  • 1 teaspoon vanilla extract**
  • 1/2 teaspoon salt
  • 1/4 teaspoon ground cinnamon**
  • 2/3 cup all purpose flour
  • 4 tablespoons (1/2 stick) unsalted butter
  • 12 ounces Golden Delicious apples (about 2), peeled, cored, thinly sliced
  • 3 tablespoons (packed) golden brown sugar
  • Powdered sugar (optional)

**To make this IC safe, at least remove the cinnamon, possibly the vanilla if it bothers you.


Preparation

  • Preheat oven to 425°F.
  • Whisk milk, eggs, sugar, vanilla, salt, and cinnamon in large bowl until well blended. Add flour and whisk until batter is smooth.
  • Place butter in 13×9-inch glass baking dish. Place dish in oven until butter melts, about 5 minutes.
  • Remove dish from oven. Place apple slices in overlapping rows atop melted butter in baking dish.
  • Return to oven and bake until apples begin to soften slightly and butter is bubbling and beginning to brown around edges of dish, about 10 minutes.
  • Pour batter over apples in dish and sprinkle with brown sugar.
  • Bake pancake until puffed and brown, about 20 minutes. Sprinkle with powdered sugar, if desired. Serve warm.


Print Friendly, PDF & Email