Homemade Rice Krispies *

P1010063


Rice Krispies

P1010060

Note: This is an old post showing a time when I could have chocolate. My IC has worsened severely.  I can no longer have even a lick of chocolate, so tread cautiously.

I’ve bought Rice Krispies treats many years ago in the package and then I learned the extremely simple recipe that I will share with you.  Now I just make them at home in a few minutes and everyone loves them. 🙂  Bonus – almost no packaging to throw away, excluding your marshmallow bag!  I’m just all for natural ingredients lately with no preservatives, fake coloring or flavors, additives.

RICE KRISPIES TREATS:  “Ingredients:  TOASTED RICE CEREAL (RICE, SUGAR, SALT, MALT FLAVORING, NIACINAMIDE, REDUCED IRON, RIBOFLAVIN [VITAMIN B2], FOLIC ACID), MARSHMALLOW (CORN SYRUP, SUGAR, GELATIN, NATURAL AND ARTIFICIAL FLAVOR), FRUCTOSE, MARGARINE (VEGETABLE OIL [SOYBEAN AND PALM OIL WITH TBHQ FOR FRESHNESS], WATER, NATURAL AND ARTIFICIAL BUTTER FLAVOR [CONTAINS MILK], DATEM, ACETYLATED MONOGLYCERIDES, BHT FOR FRESHNESS, VITAMIN A PALMITATE, VITAMIN D), CORN SYRUP SOLIDS, CONTAINS TWO PERCENT OR LESS OF DEXTROSE, GLYCERIN, SALT, NIACINAMIDE, PYRIDOXINE HYDROCHLORIDE (VITAMIN B6), THIAMIN HYDROCHLORIDE (VITAMIN B1), RIBOFLAVIN (VITAMIN B2), SOY LECITHIN.


INGREDIENTS:

  • 1/4 cup unsalted butter
  • 3 cups mini marshallows (10 oz. regular bag)
  • 6 cups Rice Krispie, or generic, cereal
  • Optional: safe treats to add, such as coconut chips/peanut butter chips (not chocolate, unfortunately).

DIRECTIONS:

  1. Spray a 13″ x 9″ pan with nonstick spray, set aside.
  2. Have all your ingredients measured and in bowls, ready to go.  This recipe goes quickly and mise en place is critical.  
  3. In a large saucepan, melt butter over low heat.
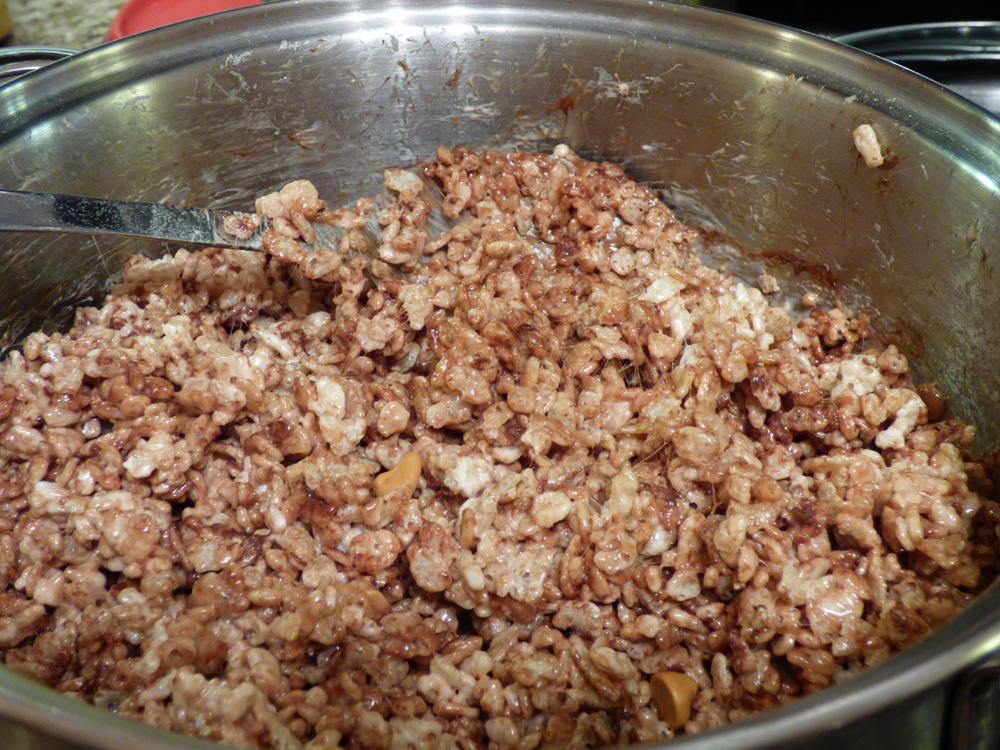
  4. Add mini marshmallows and continue to stir until they have completely melted.  Remove from heat.
  5. Stir in the cereal, coating them well with the melted marshmallow mixture.
  6. Add in any chips you can tolerate (coconut chips, peanut butter chips), mix well.  Add other ingredients or toppings as desired.
  7. Cut into squares once the mixture slightly cools (about 10 minutes), but before it really hardens!
  8. Before I receive hate mail, I’ll tell you step 8 is very important.  Clean your pan by putting it under warm water with some soap to soften the mess. 🙂

Lemon Blueberry Sweet Quick Bread

lemon-blueberry-quick-bread P1000708 P1000709


This is a very nice sweet “quick” bread.  I like calling them sweet breads because they are dessert and far from a yeast bread!  It was easy to make and the only change I made was omitting the walnuts, as I have a problem with walnuts and pecans.  It was just fine without it!  I used freshly rinsed and dried blueberries – Look at that gorgeous photo of the bottom of the bread!  I omitted the glaze because, honestly, it was sweet enough as is.  Next time I may reduce the sugar to 3/4 cup instead of 1 cup.  It took my convection oven 65 minutes and was perfectly browned.  Definitely use PAM with flour spray on your metal pans for the best result.  It popped right out!  My entire family loved it!  🙂  


BREAD: 

  • 1/3 cup melted butter

GLAZE (optional): 

  • 2 tablespoons lemon juice

DIRECTIONS:

  1. Preheat oven to 350 degrees F (175 degrees C). Lightly grease an 8×4 inch loaf pan.  (I used PAM with flour spray).  
  2. In a mixing bowl, beat together butter, 1 cup sugar, juice and eggs.
  3. Combine flour, baking powder and salt; stir into egg mixture alternately with milk.
  4. Fold in lemon zest, nuts, and blueberries. Pour batter into prepared pan.
  5. Bake in preheated oven for 60 to 70 minutes, until a toothpick inserted into center of the loaf comes out clean.
  6. Cool bread in pan for 10 minutes.
  7. (OPTIONAL GLAZE):  Meanwhile, combine lemon juice and 1/4 cup sugar in a small bowl. Remove bread from pan and drizzle with glaze.
  8. Cool on a wire rack.

Quick Elephant Ears *

elephant-ear


I like this recipe because it is so fast, simple, and tastes like an elephant ear without being deep fat fried!  Or, if you’re very picky, it tastes similar to an elephant ear from the fair!  That amount of sugar and cinnamon mixture yielded us about 3-4 tortilla toppings, but it will depend on how much topping you like.  I like to brush on a little honey to keep the sugar/cinnamon mixture sticking to the tortilla.  You want a fairly medium to high heat here to make the tortilla puff up a little and brown, otherwise it just tastes like a regular tortilla!  


INGREDIENTS:

  • 2 tablespoons plus 2 teaspoons regular white sugar
  • 1/4 tsp. ground cinnamon **
  • vegetable oil for frying (use your judgement)
  • 1 (7 inch) white flour tortilla 

**Known IC irritants, tread carefully!  To make this IC safe remove the awesome cinnamon. I know, I’m sorry!

DIRECTIONS:

  1. Combine sugar and cinnamon in a shallow bowl or large plate, set aside.  
  2. In a skillet, heat some vegetable oil.  Place one tortilla at a time in skillet.  Cook for 5 seconds or until brown in spots on one side.  Turn and cook 10 seconds longer, or until browned on the other side.  
  3. Brush with honey if desired. 
  4. Place in sugar mixture and turn to coat.  
  5. Serve immediately.  

Almond Cake

From the first time I tried a bite of this cake, I was sold.  It has such a unique flavor and crunch, you won’t forget it.  I bought sliced almonds from Menards, of all places and they were great and cheap.  I reduced the sugar to 1 cup and didn’t notice.  I traced the outside of the flipped over pan on parchment paper, and then cut the inside of that line, for a smaller circle that would fit in the pan.  You could also use pecans.  A+!
INGREDIENTS:
  • 2 cups sliced almonds, toasted (divided)
  • 3/4 cup flour
  • 3/4 tsp. salt
  • 1/4 tsp. baking powder
  • 1/4 tsp. baking soda
  • 4 large eggs (as with most baking, room temp)
  • 1 1/4 cups sugar, plus about 3 T. on the side
  • 1 T. grated lemon zest
  • 1 tsp. almond extract (don’t substitute)
  • 5 T. unsalted butter, melted
  • 1/3 cup vegetable oil
DIRECTIONS:
  1. Preheat oven to 300°.  Grease a 9″ round cake pan and line bottom with parchment paper.  Set aside.
  2. In a food processor, blend together 1 3/4 cups almonds, flour, salt, baking powder, and baking soda.  Pulse it together until the almonds are finely ground.  Pour mixture into a mixing bowl.
  3. In the same food processor bowl, combine eggs, 1 1/4 cups sugar, lemon zest, and almond extract until the mixture is pale yellow.
  4. Pour in the melted butter and oil, while the food processor is running.  Pour this mixture into the bowl with the flour mixture.  Stir until combined and pour into the prepared pan.
  5. In a small bowl, mix together the remaining 1/4 cup almonds and sugar. (*I used Turbinado sugar for the top of the cake for that added crunch, it was great!) Sprinkle this on top of the batter. 
  6. Place cake in oven and bake for one hour. 
  7. The top will bounce back and a toothpick inserted into the center will come out clean.  Let it cool for a few minutes in the pan, then turn it out onto a cooling rack. 
  8. (Turn cake onto plate, peel off parchment paper, then place on rack, almond side up.  Let cool. 

“Energy Balls” – Oatmeal Bites *

1978550_10203660290097501_88301805_o


135268_10203660290217504_828705787_o

I made these as a way to give my growing boy some needed calories but in a tasty way.  I learned a few things by making it so I know what to do better next time.  First, I am glad I made a half batch, it made 25!  Secondly, I tried reducing the honey but it needed all of it to bind together.  Thirdly, I will reduce the chocolate chips next time because it definitely was in the ‘dessert’ category more than I liked.  As written, I’m placing this in the dessert category.  But if the chocolate chips were reduced, I’d place it in the Snacks section.  So halving the chocolate chips to 1/4 cup (for a half batch) would be fine.  I didn’t use the shredded coconut because a) I didn’t have it and b) I don’t have many fans here.  I used ground flax seed, cashews, peanuts, creamy peanut butter, raisins, and everything seen in the photo.  I got this recipe from the Washington Post.  I would definitely try this next time in the food processor for ease!  Enjoy!

INGREDIENTS (FULL BATCH ingredients below, I halved these amounts):

  • 1 cup peanut butter, sunflower butter or almond butter
  • 1 cup raw or regular honey (start with less if regular honey and add more if needed)
  • 3 cups rolled oats
  • 1/2 cup ground chia seed or flax seed
  • 1 cup mini chocolate chips or cacao nibs**
  • 1 cup any combination of nuts, seeds and soft dried fruit, raisins**, cashews/peanuts, such as sunflower seeds, and dried cranberries**
  • Sweetened shredded coconut, for rolling (optional)

**Known IC irritants, tread carefully!


DIRECTIONS:

  1. Combine the nut butter and honey in a large mixing bowl and stir until smooth.
  2. Gradually add the oats and chia seed or flax seed. Add the cacao nibs or chocolate chips and the nut-seed-fruit mixture, and mix gently to combine.
  3. Use your hands to roll the mixture into balls (I used a cookie scoop) approximately the size of ping-pong balls. If desired, roll them in shredded coconut.
  4. Place the balls in paper mini-muffin cups. At this point, you can eat them, but they’ll be less sticky after a night in the refrigerator. They taste best after one day in the fridge.  Layer the balls in an airtight container, using wax paper to separate the layers, and refrigerate for 7 to 10 days or freeze for up to 3 months.

Eggless Chocolate Wacky Cake * (Not IC Safe)

1724405_10203477335283745_250935993_n


If you want an incredible chocolately cake that is eggless, milkless, but full of flavor, this is it.  I’ve been making this so many years.  Since my husband’s allergic to eggs, it is our staple for chocolate cake.  I don’t try any other chocolate cake recipes because this is perfection to us.  It bakes well and has a good crumb.  It’s not too dense either.  This recipe was famous during The Depression because it uses inexpensive and easy to acquire ingredients – all of them are shelf stable.  Enjoy…

INGREDIENTS:

  • 1 1/2 cups all-purpose flour
  • 1 cup white sugar
  • 4 T. unsweetened cocoa powder**
  • 1 tsp. baking soda
  • 1/2 tsp. salt
  • 1 tsp. vanilla extract (always use the good stuff, real vanilla extract)**
  • 1 T. apple cider vinegar**
  • 6 T. vegetable oil
  • 1 cup cold water

**Known IC irritants, tread carefully!

DIRECTIONS:

  1. Preheat oven to 350° F.
  2. Mix flour, sugar, salt, baking soda, and cocoa in a mixing bowl. 
  3. Make three depressions, or wells, in your dry mixture. 
  4. Pour oil into one well, vinegar into the second, and vanilla into the third one.
  5. Pour water all over the mixture and stir well, breaking up all clumps until you have a smooth batter. 
  6. Pour batter into a 8×8″ or 8 or 9″ round cake pan.  (I’ve used all of these sizes and they’ve worked well.  I use a steel pan and spray PAM baking with flour on it.)
  7. Bake at 350° for 30-40 minutes, or until toothpick inserted comes out clean.
  8. Let fully cool and frost with your favorite frosting – optional. 

Kit Kat and M&M Candy Cake * (Not IC Safe)


20140307_120511small

SAMSUNG CAMERA PICTURES

Yes, when I checked out at the register I worried if they thought I was actually eating all this candy by myself. 🙂

SAMSUNG CAMERA PICTURES

I pre-chilled my Kit Kat bars in the fridge so handling them would not bring on melting. 

Never frost a warm cake!

I used my new Wilton cake turntable here and it was extremely handy.  I used an offset spatula to frost the cake and prior to frosting I put down wax paper that was taped on underneath the turntable.  Once the cake set in the fridge a few hours, I removed the wax paper and tape to reveal a clean edge!  

SAMSUNG CAMERA PICTURES

SAMSUNG CAMERA PICTURES

1724405_10203477335283745_250935993_n

 I found this recipe at NOSHWITHME.COM.  It was a perfect addition to our birthday parties.  It was fun, delicious, and very attractive.  Also, it was easy, which is great when you need a break from piping.  You can use any colored 2-layer cake, but it’s preferable to use chocolate frosting so the frosting doesn’t show through the Kit Kats, believe me.  

INGREDIENTS:

  • Two 8″ or 9″ cakes, any flavor  (I used an eggless wacky cake recipe).
  • Chocolate frosting (enough for a 2-layer cake)
  • One 12.60 ounce bag of M&Ms (or any candy you want to top it with)
  • 11-12 full size (not snack size) packages Kit Kats (I bought 5 “XL” Kit Kat bars and barely had any leftover.)

Preparation

  1. Bake cakes and let cool at least an hour, or until room temperature.
  2. Using a cake leveler or serrated knife, level cakes so the tops are no longer domed. (If you are using a serrated knife, it helps to freeze the cake first.)
  3. Separate each Kit Kat so you have sections of two Kit Kats.  The original author put them in the fridge first so they wouldn’t melt while I was handling them.  I personally think you could also split up all the Kit Kats and not even leave 2-Kit Kat sections, I will try that next time. 
  4. Frost the top of one cake, then place the second cake on top of it. Frost the top of the second cake and the sides of the stacked cakes.
  5. Place the Kit Kats around the frosted cake, as close together as possible.
  6. You can also tie a ribbon around the cake to keep the Kit Kats from moving. Pour the M&Ms on the top of the cake. Slice and serve!


Eggless Chocolate Chip Cookies * (Not IC Safe)

SAMSUNG CAMERA PICTURES


If you need to make eggless cookies for someone, such as my husband with an egg allergy, these are the perfect ones.  Honestly, I can eat eggs and I look forward to these!  They’re just perfect to me.  I use a cookie scoop for even proportions, which will give you even baking results.  I put them on parchment paper on top of metal pans; I use AIRBAKE pans.  They freeze well too, but are best fresh. I’ve made a double batch of the recipe below and it works out great for a big crowd.  The mixer works great here to mix the butter/sugars.

INGREDIENTS:

  • 1/2 cup butter or margarine, ROOM TEMPERATURE
  • 1/3 cup white sugar
  • 1/2 cup firmly packed brown sugar
  • 1 1/2 cups flour
  • 1 tsp. baking soda
  • 1/2 T. vanilla extract
  • 3 T. vegetable or canola oil
  • 2 T. water (use up to 3 T. if it’s too dry)
  • About 5 oz. semisweet chocolate pieces (regular size chips work best)**
  • 1/4 cup chopped nuts (totally optional)

**Known IC irritants, tread carefully!

DIRECTIONS:

  1. Preheat oven to 350° F. (Use convection mode if you have it, it works well for us).
  2. In a large bowl, with a handheld mixer or a stand mixer, set on medium speed, cream butter and BOTH sugars until fluffy, about 2 minutes.
  3. Slowly mix in flour and baking soda.
  4. Add vanilla, oil, and water.  Mix until completely combined.
  5. With a spoon, fold in nuts, if used, and chocolate chips.
  6. Using a cookie scoop, drop on cookie sheets (or parchment paper on top of cookie sheets), spacing the cookies 2″ apart.
  7. Bake for 8-10 minutes, watch closely for when they turn light brown.
  8. Cool on wire racks in pans for 3 minutes (WAIT UNTIL THEY HARDEN UNTIL MOVING THEM!)
  9. Then remove with a spatula and transfer onto wire racks and cool.

One-Bowl Chocolate Orange Bundt Cake * (Not IC Safe)

Choc Orange Bundt With Eggs 12-13

This is a great cake for a lot of company coming.  It makes a lot of batter and a lot of cake.  I’ve made it twice and I prefer the dusted version above versus the frosting version I made.  The dusted version is a lot simpler and the cake was moister.  Definitely use an electric mixer for this, it will uniformly beat it to perfection.  I used all orange juice, no water.  I didn’t do the streusel.  Always use room temp. eggs.

INGREDIENTS:

  • 2/3 cup cocoa, sifted**
  • 2 1/4 cups all-purpose flour
  • 2 cups sugar
  • 1 1/2 teaspoons baking powder
  • 1 1/2 teaspoons baking soda
  • 3/4 teaspoon salt
  • 1 1/2 teaspoons instant coffee granules**
  • 1 1/2 cups unsweetened orange juice (or use 3/4 cup each juice and water or 1-1/2 cups water)**
  • 3 eggs
  • 2 teaspoons vanilla**
  • 1 1/4 cups canola oil or 1 1/4 cups vegetable oil

**Known IC irritants, tread carefully!

Directions:

  1. Set oven to 350 degrees F.
  2. Set rack to second-lowest position.
  3. Generously grease and flour a 12-cup bundt pan (I use my Pan Release for this, make certain to well-grease your pan!).
  4. In an extra large mixing bowl, combine all the cake ingredients; mix on medium speed of an electric mixer for about 3 minutes or until very well combined.
  5. Bake for about 50-60 minutes or until the cake tests done (if using the streusal the cake will take slightly longer to bake).
  6. Cool in pan for about 15-20 minutes before removing.
  7. Frost or glaze if desired when completely cooled.

Optional STREUSAL; this is only optional and may be sprinkled in the middle of the batter, mix together 1/2 cup finely chopped walnuts with 1/4 cup shredded coconut, 1/3 cup brown sugar, 1-1/2 teaspoons cinnamon and 2 tablespoons unsweetened cocoa powder.


Apple Scones *

20140101_202443_resized

20140101_204005_resized

20140101_210131_resized

20140101_211221_resized

I saw this recipe and bookmarked it because it has no eggs, a smaller amount of sugar, and got great reviews.  It’s from Food.com.  I did it completely in the food processor. First, I shredded the apple (but only used 1/2 cup), then I removed the shredded apple, and mixed my other ingredients (flour, sugar, baking powder, baking soda, and salt).  Then I added back my apple and then put in the milk.  I even ‘kneaded’ it in the processor instead of on a cutting board.  Easy, just a little sticky recipe, so I added more flour and covered it in flour before shaping into a circle.  DELICIOUS!  Add some butter and preserves, serve with tea!  It goes great with Dutch apple preserves!

INGREDIENTS:

  • 2 cups flour
  • 1/4 cup sugar
  • 2 teaspoons baking powder
  • 1/2 teaspoon baking soda
  • 1/2 teaspoon salt
  • 1/4 cup butter, cold
  • 1/2 cup apple, shredded (1 medium)
  • 1/2 cup milk
  • to taste milk, for topping the scones
  • to taste sugar
  • to taste cinnamon**

**Known IC irritants, tread carefully!  Omit the cinnamon to make it IC safe.

DIRECTIONS:
  1. Preheat oven to 425 degrees.
  2. Measure flour, sugar, b. powder, soda, and salt into large bowl. Cut in butter until crumbly.
  3. Add apple and milk. Stir to form soft dough.
  4. Turn out onto lightly floured board; knead gently 8 to 10 times. Pat into two 6-inch circles. Place on greased baking sheet.
  5. Brush tops with milk; sprinkle with sugar and cinnamon. Score each top into six pie-shaped wedges. 
  6. Bake for 15 minutes or until browned and risen. Serve with warm butter and marmalade.
  7. Optional: Add 1/2 cup currants to batter.