Italian Focaccia Bread * (Not IC Safe)

P1070262


P1070264

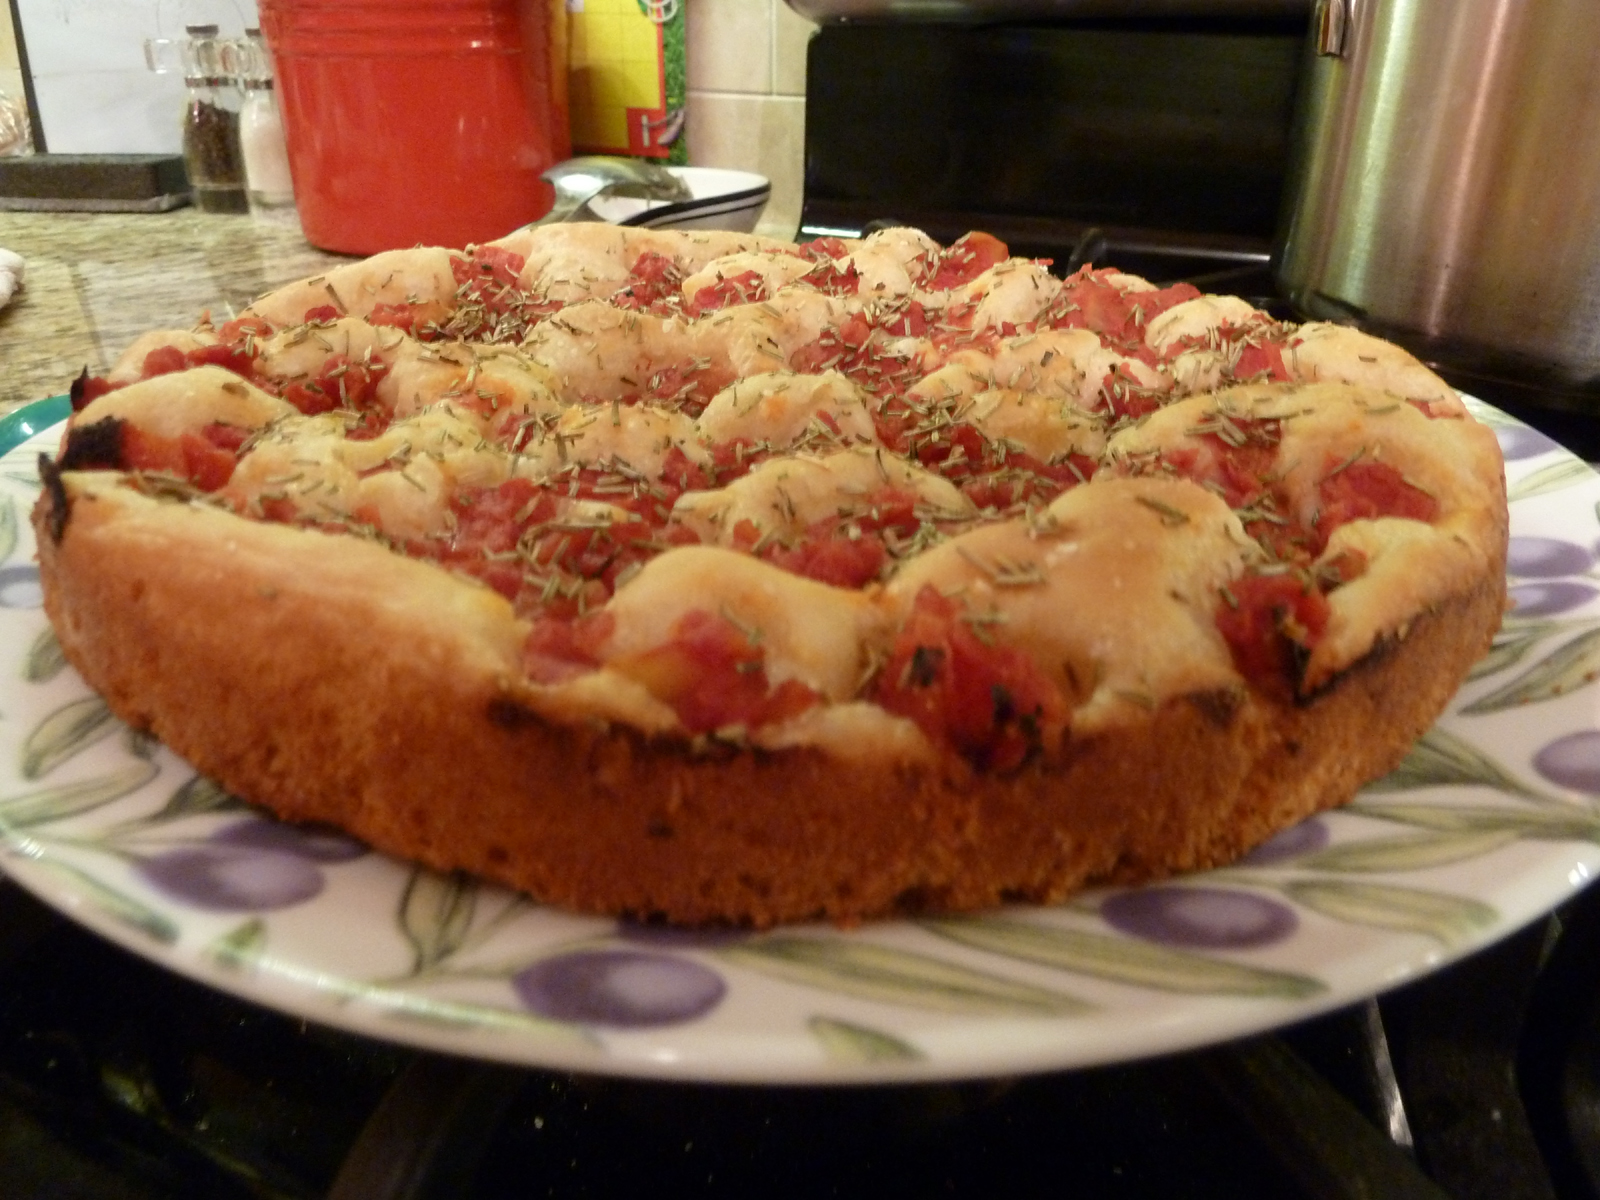
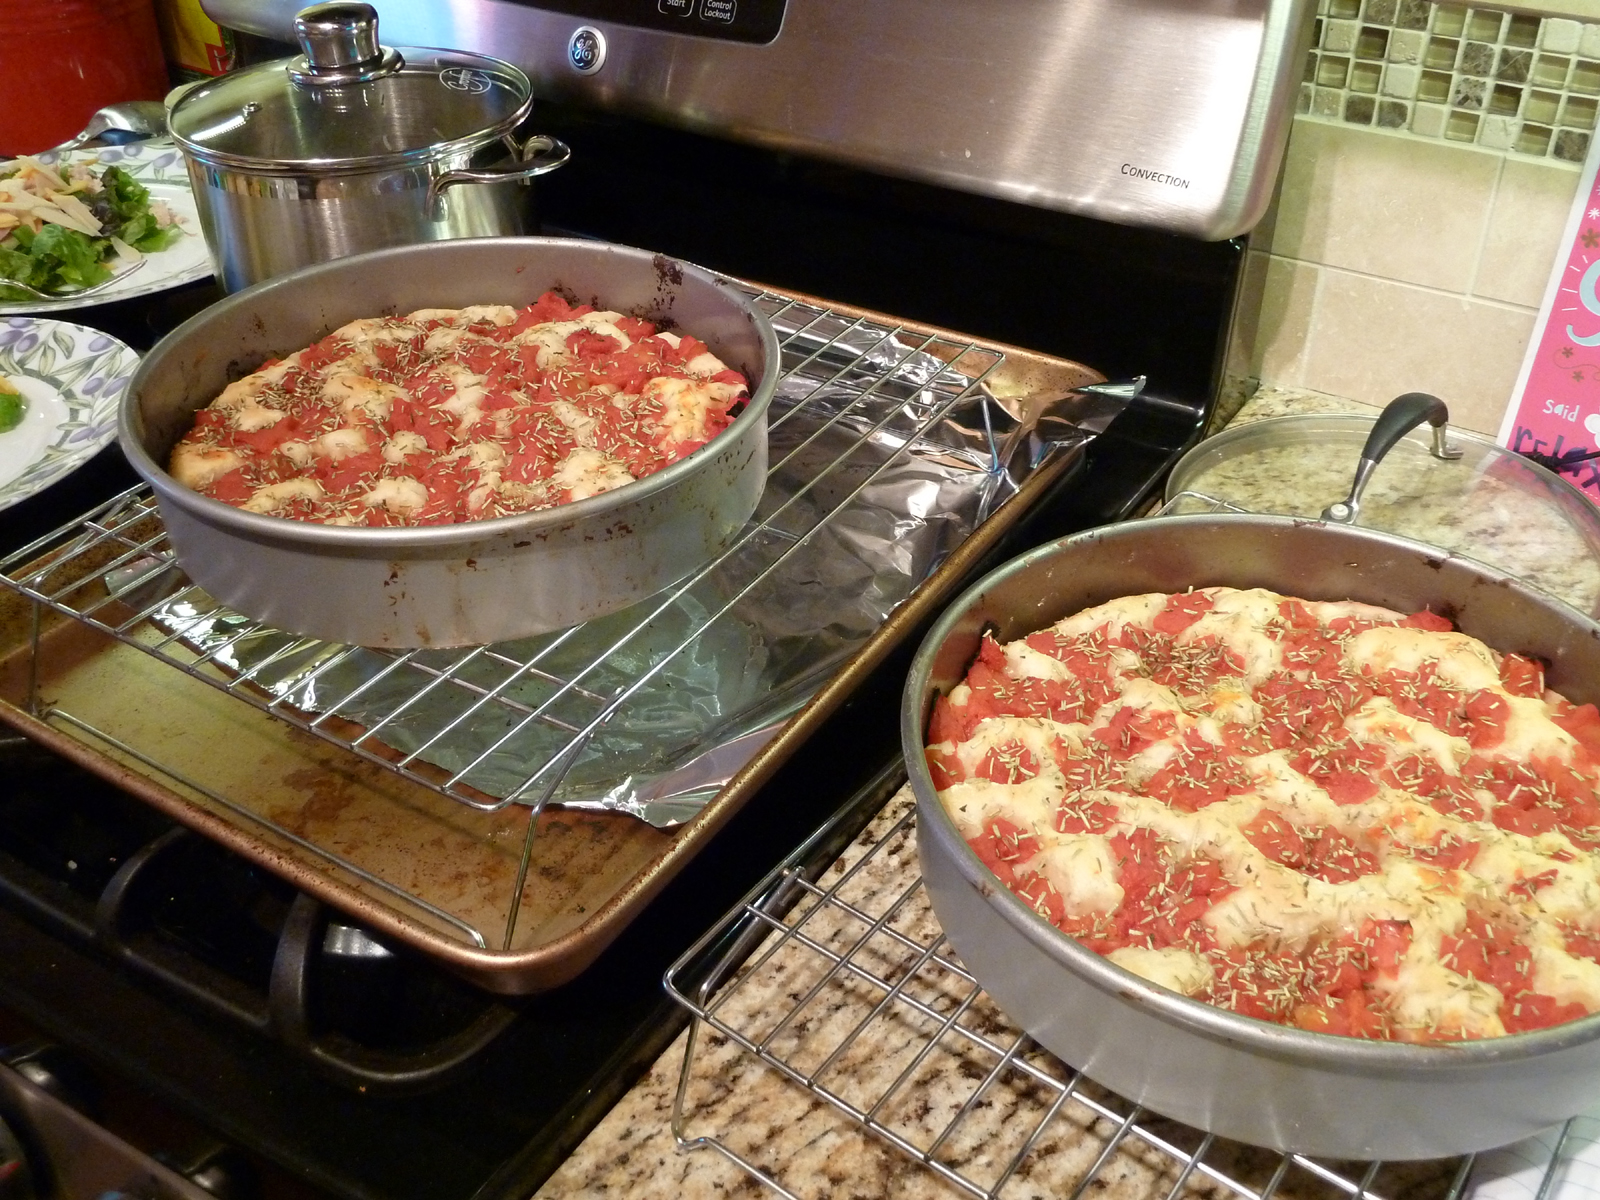
I love this recipe.  It’s from a cookbook I don’t use that often, but it’s a great book by Kelly Rudnicki called “The Food Allergy Mama’s Baking Book: Great Dairy, Egg, and Nut Free Treats for the Whole Family”.  I followed the directions exactly – make sure you drain those diced tomatoes well or you will have soggy bread!  Remove promptly from pan or it’s hard to remove.  At the time I did not own a 14″ round pizza pan so I used two nonstick pans.  Since then I’ve thrown out my nonstick pans (they always had horrible results for me; now I’m all for steel) and bought steel replacements including a 14″ round pizza pan. 

INGREDIENTS:

  • 1 1/3 cups warm water (about 110°F)
  • 1 package active dry yeast
  • 5 tablespoons olive oil, divided
  • 3 1/4 cups unbleached all-purpose flour
  • 1 1/2 teaspoons salt
  • 2 cups canned diced tomatoes, drained**
  • 1 tablespoon dried rosemary, crumbled
  • 1/4 teaspoon kosher salt for sprinkling

**Known IC irritants, tread carefully!

DIRECTIONS:

  1. Combine the warm water, yeast, and 3 tablespoons of the olive oil in a liquid measuring cup with a wire whisk. 
  2. In a medium bowl, combine the flour and 1 1/2 teaspoons salt with a wire whisk, and slowly mix this dry mixture into the water mixture with a rubber spatula.
  3. Stir until the mixture is well incorporated, and then mix quickly for about 2 minutes.
  4. Cover with plastic wrap, and let rise in a warm place until doubled in size, about 1 hour.
  5. Using a brush, spread 1 tablespoon olive oil on the bottom and up the sides of a 14″ round pizza pan. 
  6. Transfer the dough into the pan, and press the dough into the pan and up the sides.  Cover with plastic wrap sprayed with baking spray, and let rise again until doubled in size, 30-45 minutes.
  7. Preheat oven to 425°F.  Using your fingers, poke holes in the surface of the focaccia. 
  8. Drizzle the remaining 1 tablespoon olive oil evenly over the top. 
  9. Sprinkle with the drained tomatoes, rosemary, and kosher salt, and bake for 20-25 minutes, or until the top is golden brown. 
  10. Cool on a wire rack for about 10 minutes or less and cut into slices.


P1070267

Print Friendly, PDF & Email

Pork Dumplings

P1100040

This was our first try at dumplings!  We were lucky and they were not that difficult!  I really loved how all the flavors mixed and the green onion and sesame oil are wonderful additions.  I had to halve the recipe and I’m glad I did because otherwise I would have been making dumplings until my arms fell off.  I used powdered ginger instead of ginger root and I reduced the garlic from 4 cloves to just 1.  I did buy the proper Chinese cabbage.  I ended up adding some carrot for color and flavor, which I think helped.  A very good recipe that is a keeper.  If you don’t have a bamboo steamer like me, I used my steel steamer insert for my pan.  BIG WARNING: PAM your steel steamer otherwise every dumpling will stick and it’ll be a huge mess!  After we PAM’ed the next load of dumplings, they came out flawlessly!

INGREDIENTS:

  • Original recipe makes 100 dumplings – I halved this recipe.
    • 100 (3.5 inch square) wonton wrappers

    • 1 3/4 pounds ground pork

    • 1 tablespoon minced fresh ginger root

    • 4 cloves garlic, minced

    • 2 tablespoons thinly sliced green onion

    • 4 tablespoons soy sauce

    • 3 tablespoons sesame oil

    • 1 egg, beaten

    • 5 cups finely shredded Chinese cabbage


DIRECTIONS: 


  1. In a large bowl, combine the pork, ginger, garlic, green onion, soy sauce, sesame oil, egg and cabbage. Stir until well mixed.
  2. Place 1 heaping teaspoon of pork filling onto each wonton skin. Moisten edges with water and fold edges over to form a triangle shape. Roll edges slightly to seal in filling. Set dumplings aside on a lightly floured surface until ready to cook.
  3. To Cook: Steam dumplings in a covered bamboo or metal steamer for about 15 to 20 minutes. Serve immediately.


P1100042

Print Friendly, PDF & Email

Grilled Mexican Steak Salad * (Not IC Safe)

P1090757


This recipe is from “Cook This, Not That” Cookbook (2010), which I got from the library.  This salad is A+!  Instead of T.G.I. Friday’s Sante Fe Chopped salad, which has 1,800 calories!!, they came up with this similar recipe that saves 1,460 calories!  I loved this salad so much I need to make it soon!  Even though I omitted the onion, jalapeno, and the chipotle pepper, I found it so tasty!

INGREDIENTS:

  • 3 corn tortillas, cut into thin strips
  • 4 small Roma tomatoes, chopped**
  • 1 red onion, diced**
  • 1 jalapeno pepper, minced**
  • 1/2 cup chopped fresh cilantro**
  • Juice of 1 lime**
  • 8 oz. flank steak
  • salt and black pepper**
  • 1/2 Tablespoon red wine vinegar**
  • 1 tsp. canned chipotle pepper (I didn’t find this necessary)**
  • 1/2 Tablespoon honey
  • 2 Tablespoons olive oil
  • 1 head romaine lettuce, chopped
  • 1/2 can (14-16 oz) black beans, drained**
  • 1 avocado, pitted, peeled, and thinly sliced

**Known IC irritants, tread carefully!

DIRECTIONS:

  1. Preheat the oven to 400° F. Place the tortilla strips on a baking sheet and bake for 8-10 mins, until lightly brown and crispy.  Set aside.
  2. In mixing bowl, combine the tomatoes, onion, jalapeno, cilantro, and half the lime juice.  Set the salsa aside.
  3. Preheat a grill or grill pan.  Season the steak with salt and pepper.  Once the grill or grill pan is heated, toss on the steak.  Cook for 4-5 minutes per side, depending on thickness, until firm but yielding.  Let the steak rest for 5 mins before slicing it thinly against the grain of meat.
  4. Combine the remaining lime juice with the vinegar, chipotle, and honey.  Slowly drizzle in the olive oil, whisking to combine.  Toss the lettuce with enough vinaigrette to lightly coat, then divide among 4 plates. 
  5. Top each serving with slices of steak, black beans, avocado, salsa, and a few tortilla strips. 
Print Friendly, PDF & Email

Greek-Style Grilled Pork Chops with Marinade * (Not IC Safe)

greekporkchops


I’m not a huge fan of pork, so when I find a pork recipe I love, I really keep it!  This is a recipe I love and I think you will too!  It is so moist and flavorful, especially because of the quantity of oil used, but you can reduce it somewhat.  I could not find white wine Worcestershire sauce, so I used white wine.  I replaced the garlic cloves for 1/2 tsp. garlic powder.  It smelled exactly like a restaurant! 

Ingredients:

  • 4-6 pork loin rib chops (about 3/4 inch thick)For the Marinade:
  • 1/2 cup extra virgin olive oil
  • 1/2 cup white wine Worcestershire sauce**
  • Juice of two large lemons**
  • 2 cloves garlic, minced
  • 1 tbsp. dried oregano
  • Salt and freshly ground black pepper**


DIRECTIONS:

Whisk marinade ingredients together in a bowl. Place the chops in a shallow pan or other non-reactive container. Pour the marinade over the chops, cover with plastic wrap and chill for at least an hour.

Grill on medium-high heat until desired doneness is reached. On our grill, it usually takes about 6-7 minutes per side. Cooking times will vary. Allow the chops to rest for 5-10 minutes before cutting in to them.

Give the chops a sprinkle of coarse salt and a squeeze or two of lemon juice prior to serving.

Print Friendly, PDF & Email

Pumpkin Bread *


P1090198

pumpkin-bread-small

I love this recipe, it fills your home with a pumpkin aroma.  I make it year round!  The ingredients below make 2 loaf pans; so I usually divide it in half because we don’t eat that much of it.  It freezes well so you can definitely freeze the remainder!  One time I made it I did not have two eggs, so I used one egg + a heaping tablespoon of applesauce and it came out fine!  So next time I may just substitute applesauce for the two eggs!  For me, the one loaf cooked 90 minutes just like they said! 

INGREDIENTS:

  • 3 1/2 cups all-purpose flour
  • 2 teaspoons baking soda
  • 2 teaspoons salt
  • 1 teaspoon baking powder
  • 1 teaspoon ground nutmeg**
  • 1 teaspoon ground allspice**
  • 1 teaspoon ground cinnamon**
  • 1/2 teaspoon ground cloves**
  • cups white sugar
  • 1 cup canola oil
  • 4 eggs, beaten
  • 2 cups solid pack pumpkin puree
  • 2/3 cup water

**Omit these ingredients if they bother you. 

DIRECTIONS: 

  1. Preheat oven to 350 degrees F (175 degrees C). Grease two loaf pans.
  2. In a medium mixing bowl, combine flour, baking soda, salt, baking powder, nutmeg, allspice, cinnamon and cloves.
  3. In a large bowl with an electric mixer, blend sugar, oil and eggs. Stir in pumpkin. Slowly blend the flour mixture into pumpkin mixture. While blending the mixture add water incrementally. Pour the batter into two prepared loaf pans.
  4. Bake in a preheated 350 degrees F (175 degrees C) oven for 90 minutes. Let cool for 10 minutes before removing from the pans.


Print Friendly, PDF & Email

Orange Cranberry-Nut Bread * (Not IC Safe)

20130806_120614_resized

This is my first attempt at anything other than dinner in the slow cooker.  This isn’t a true yeast bread, it’s more of a quick bread, like dessert.  I liked that it wasn’t too sugary.  At first I thought it would be a flop when the sides were cooking faster than the top/middle.  I’m glad I gave it longer to cook, because it tastes great.  I substituted the pecans for the peanuts and it tasted wonderful and the peanuts got soft and warm.  I didn’t have dried orange peel so I grated fresh orange peel and it was fine.  This is definitely a winner for taste and looks!  It’s from my small slow cooker book named “Crock Pot Favorite Slow Cooker Recipes” (2010).  My son helped make it and he loves it!

The recipe says to use a round slow cooker approximately 3 quart.  I have two slow cookers.  One is oval and the other is round and has inserts for 2, 4, and 6 quarts.  I used the 4 quart round insert.  Since every slow cooker I’ve ever owned runs hot, I decided to cook this on the low setting.  

P1100046

Makes 8-10 servings.

INGREDIENTS:

  • 2 cups all-purpose flour
  • 1 teaspoon baking powder
  • 1/2 teaspoon baking soda
  • 1/4 teaspoon salt
  • 1/2 cup chopped pecans (or peanuts)
  • 1 cup dried cranberries
  • 2 teaspoons dried orange peel
  • 2/3 cup boiling water
  • 3/4 cup sugar
  • 2 tablespoons shortening
  • 1 egg, lightly beaten
  • 1 teaspoon vanilla

DIRECTIONS:

  1. Coat 3 quart slow cooker with nonstick cooking spray. 
  2. Blend flour, baking powder, baking soda, and salt in medium bowl.  Mix in pecans or nuts, set aside.
  3. Combine cranberries and orange peel in separate medium bowl, pour boiling water over fruit mixture and stir.
  4. Add sugar, shortening, egg, and vanilla, stir just until blended.
  5. Add flour mixture, stir just until blended.
  6. Pour batter into slow cooker.  Cover, cook on high 1 1/4 to 1 1/2 hours or until edges begin to brown and cake tester inserted into center comes out clean. 
  7. Remove stoneware carefully from slow cooker, with oven mitts.
  8. Cool on wire rack about 10 minutes, remove bread from stoneware and cool completely on rack.
Print Friendly, PDF & Email

Perfect Pumpkin Pancakes * (Not IC Safe)

P1100044small

These are my wonderful pumpkin pancakes.  I love, love, love them.  They remind me of fall even if you have them in summer!  Here’s the original Allrecipes.com link.  I will give you the non-doubled recipe below.  I always double it and freeze the remainder in a freezer bag, no wax paper separation needed.  The doubled recipe makes about 28-34 pancakes depending upon the size.  They unfreeze wonderfully.  Either microwave 10 seconds or leave on the counter 5-10 minutes before putting them in the toaster, etc.  If you’re interested in the two-burner pan I use, I got it as a great gift, the link is here.  It’s one of the rare nonstick things I love; I use all steel for everything else.  I usually reduce the cinnamon to 1 tsp for a doubled recipe, I like some flavor but I don’t want it overpowering.  Don’t over-stir in this one!  Finally, don’t do high heat!  They will burn.  Do medium heat. 

P1100043small


NON DOUBLED RECIPE: (The recipe says 12, but it could make about 14-17 pancakes, depending on size):

Ingredients:

  • 1 1/2 cups milk
  • 1 cup pumpkin puree
  • 1 egg
  • 2 tablespoons vegetable oil
  • 2 tablespoons vinegar*


  • 2 cups all-purpose flour
  • 3 tablespoons brown sugar

  • 2 teaspoons baking powder
  • 1 teaspoon baking soda
  • 1 teaspoon ground allspice*
  • 1 teaspoon ground cinnamon*
  • 1/2 teaspoon ground ginger*
  • 1/2 teaspoon salt

**Known IC irritants, tread carefully!

Directions: 

  1. In a bowl, mix together the milk, pumpkin, egg, oil and vinegar. Combine the flour, brown sugar, baking powder, baking soda, allspice, cinnamon, ginger and salt in a separate bowl. Stir into the pumpkin mixture just enough to combine.
  2. Heat a lightly oiled griddle or frying pan over medium heat. Pour or scoop the batter onto the griddle, using approximately 1/4 cup for each pancake. Brown on both sides and serve hot.
Print Friendly, PDF & Email

Challah Bread


P1090499smallP1090501small

P1090504small

This was one of those recipes that I was so proud of myself for completing!  This is a confidence building recipe for sure!  Follow the directions exactly and you should have no problems…I used all purple flour.  This recipe is from my older book, “Betty Crocker Cookbook, New Edition” (c) 2005.  I used cooking spray in step #8.   I promise it is FUN!  My favorite photo is the one at the bottom of the page.

INGREDIENTS:

  • 3 to 3 1/4 cups all-purpose or bread flour
  • 1/4 cup sugar
  • 1 1/2 teaspoons salt
  • 1 package regular or quick active dry yeast (2 1/4 teaspoons)
  • 1 cup very warm water (120° to 130°F)
  • 2 tablespoons vegetable oil
  • 1 large egg
  • Butter or margarine, melted, if desired


DIRECTIONS:

  1. In large bowl, mix 1 1/2 cups of the flour, the sugar, salt and yeast.  Add warm water and oil.  Beat with electric mixer on low speed for 1 minute, scraping bowl frequently.
  2. Beat on medium speed 1 minute, scraping bowl frequently.
  3. Add egg; beat until smooth.  Stir in enough remaining flour to make dough easy to handle.
  4. Place dough on lightly floured surface.  Knead about 10 minutes or until dough is smooth and springy.  (I used my Kitchenaid for this step).
  5. Grease large bowl with shortening.  Place dough in bowl, turning dough to grease all sides.  (At this point, dough can be refrigerated up to 24 hours).
  6. Cover bowl loosely with plastic wrap and let rise in warm place about 1 hour or until dough has doubled in size. Dough is ready if indentation remains when touched.
  7. Lightly grease cookie sheet with shortening or spray with cooking spray.
  8. After pushing fist into dough, divide into 3 equal parts.  Roll each part into 14-inch rope (use a ruler).
  9. Place ropes close together on cookie sheet.  Braid ropes gently and loosely, starting in the middle; do not stretch.  Pinch ends, tuck ends under braid securely. 
  10. Brush with vegetable oil.  Cover loosely with plastic wrap and let rise in warm place 40-50 minutes or until doubled in size.
  11. Heat oven to 375°.
  12. In a small bowl, mix 1 egg yolk and 2 tablespoons water, brush over braid.  (This gives it its shine!)
  13. Sprinkle with poppy seeds, if desired.  Bake 25-30 minutes or until golden brown.

IMG_1738s


IMG_1749s

Print Friendly, PDF & Email

Grilling Tip

IMG_20130313small

Do you know why this photo looks so scrumptious?  I was lucky enough to get perfect lighting, sure, and the colors of the food just are pretty, and the rice pilaf matches the granite, BUT….do you notice that the B.S. (boneless skinless) chicken breast is grilled to perfection?  There are a lot of tools and appliances out there where it doesn’t matter what brand you have, but after owning an expensive WEBER grill, our food always turns out perfectly the first time.  When we first got it, we commented on how the chicken could be cooked to safety standards but also be JUICY?  Was that possible?  Our old Charbroil looked good and looked expensive, but that didn’t matter because the final product was often burnt, dried out, and not so perfectly grilled.  The old Charbroil looked expensive but it was hiding behind its stainless steel and black facade.  In about three years, it was garbage and everything on it had fallen apart and the grates completely disintegrated.  I was lucky for someone to pick it up off Craigslist for mere pennies of what we paid.  Don’t be fooled by Charbroil. 

My husband was very good at grilling but it didn’t matter because of the inferior tool he was using – the Charbroil!  I urge you to reconsider buying charbroil and put that $120-400 towards a grill that has been known to keep on working for decades – a WEBER, no matter if it’s Weber’s inexpensive end or their high end.  And parts are easier to find with Weber, not so much with Charbroil! 

Sometimes, the issue that keeps  you from that wonderfully prepared food is price.  Here’s our Weber Genesis E-310 propane grill, Made in the U.S.A.  Obviously ours wasn’t cheap, but this is one of those purchases where money doesn’t matter to us because the end result is perfection and we will get many, many years out of it.  I highly recommend this grill, or any Weber grill.  Weber has many price points!  We own it’s inexpensive brother (usually in the $50’s-$60’s) and it’s performed beautifully as well – a Weber 1520 Gas Go-Anywhere Grill.


Print Friendly, PDF & Email

Asian Beef With Broccoli

20130503_174933small

To say I love this recipe is an understatement.  Sometimes slow cooker recipes look great on paper and the execution is lacking.  This one really is awesome!  I used fresh broccoli and I reluctantly used the oyster sauce.  I thought it would ruin the recipe and smell fishy, but it was a great enhancement (and did not smell fishy!).  I used beef stock from bouillon.  The sauce that is created is SOOO good and the rice soaks it up.  I recommend LOW HEAT as my cooker cooks fast for a “slow” cooker.  It’s from my new cookbook “Crock Pot: Favorite Slow Cooker Recipes (c) 2010”.  Before I drool, I’ll tell you the recipe:

Makes 4-6 servings.  Takes approximately 3 1/4 hours on high.  (It took me probably that same time on low).

INGREDIENTS:

  • 1 1/2 pounds boneless chuck steak, about 1 1/2 inches thick, sliced into thin strips. 
  • 1 can (10.5 ounces) condensed beef consomme, undiluted.
  • 1/2 cup oyster sauce
  • 2 tablespoons cornstarch
  • 1 bag (16 oz) fresh broccoli florets
  • Hot cooked rice
  • Sesame seeds (optional)

DIRECTIONS:

  1. Place beef in slow cooker and pour consomme and oyster sauce over beef.  Cover and cook on high 3 hours.  (I did low heat and it turned out fine).
  2. Combine cornstarch and 2 tablespoons cooking liquid in small bowl.  Stir well to combine.  Stir into slow cooker.
  3. Cover, cook on high 15 minutes longer or until thickened (I still did low heat).
  4. Prepare broccoli as directed on bag, or steam your fresh broccoli.  Put broccoli in slow cooker and gently toss beef and broccoli together.
  5. Serve over rice, garnish with sesame seeds if desired. 
Print Friendly, PDF & Email