Healthy Baked Slow Cooker Chicken

chicken

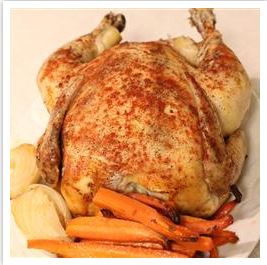
I plan to make this again soon.  It’s a recipe I found on Allrecipes.com.  It is super simple and can be altered any way you like.  I drizzled a little olive oil on the chicken.  The special thing about this recipe is using the wads of aluminum foil to keep the chicken from sitting in it’s own fat/oil/and juices.

INGREDIENTS:

  • One 2-3 LB. whole chicken
  • Salt and pepper to taste
  • 1 tsp. paprika
  • 3 large carrots, split lengthwise and cut into 2-in. pieces
  • 1-2 medium onions, quartered (optional)
  • 2 T. fresh chopped parsley
  • Extra virgin olive oil drizzle (optional)

DIRECTIONS:

  1. Wad three pieces of aluminum foil into 3-4″ balls, and place them in the bottom of the slow cooker.
  2. Rinse the chicken inside and out under cold running water (optional).
  3. Pat the chicken dry with paper towels.
  4. Season with salt, pepper, and paprika, and place in the slow cooker on top of the crumbled aluminum foil.
  5. Optional: drizzle chicken with a little extra virgin olive oil.
  6. Set the slow cooker to high for one hour.  (Set kitchen timer to one hour to remind yourself).
  7. **After the one hour on high, you can decide how long to cook the chicken and veggies, it’s up to you and the temp. of your slow cooker!
  8. Then, turn down to low for about 2-3 hours.
  9. Add the vegetables and then cook another 2 hours depending on doneness.  Make sure chicken is no longer pink and juices are clear (it’s best to use a digital thermometer!)
  10. Sprinkle with fresh parsley and serve.

Rachael Ray’s Every Day Cooking — Sesame Pork Chops –Easy and Delicious


sesame-pork-chops

This is Rachael Ray’s easy and quick recipe for sesame pork chops.  I am extremely picky with pork and I don’t know why.  I could try ten pork recipes and there may be only one I’d like to make again!  So, the fact that this recipe is acceptable to me, is quite shocking.

This is a meal that could be a staple with fresh or frozen boneless pork chops, as most people have the other ingredients in their pantry or fridge all the time.

P.S. buy your sesame seeds in bulk at a discount grocery store.  Don’t use your tiny McCormick container for this recipe because you need a half cup of sesame seeds.  You’ll go broke, LOL.  

Serves 4

INGREDIENTS:

  • 6 T. soy sauce (reduced sodium is fine, that’s all I use)
  • 3 T. brown sugar
  • 2 T. rice vinegar (Look in the Asian/ethnic aisle)
  • 4 boneless pork chops
  • 1 T. vegetable oil
  • 1/2 cup sesame seeds

DIRECTIONS:

  1. In a resealable bag, mix soy sauce, sugar, and vinegar.  Add pork, cover with plastic wrap, marinate 20 minutes in fridge.
  2. In skillet, heat 1 T. oil over med-high heat.
  3. Press seeds into pork on both sides.
  4. Cook, turning 10 minutes.
  5. Check for doneness with a digital thermometer.
  6. Lightly tent the meat and let it rest before serving.


Optional Simple “Leftover Marinade” Pan Sauce:

  1. I removed the meat from the pan.
  2. I took the leftover marinade and poured it into the same pan.
  3. I brought the marinade to a safe and hearty boil for a few minutes (because it did touch raw meat!)
  4. Then I took a small glass of water (2-3 tablespoons) and added 1-2 tsp. of flour or cornstarch, mix that thoroughly.
  5. Then add that cornstarch water or flour water to your sizzling marinade in your pan.
  6. Simmer a few minutes and your marinade will thicken into a delectable sauce.

Amazingly Easy French Dip Sandwiches

French dip sandwiches


This is one of my super keeper recipes!  Why?  Because it’s nearly effortless.  If you have FIVE minutes you can throw this together before you zip out the door, a few hours before dinner!  It’s THAT easy.  It’s from a Betty Crocker book.  I’ve been making it years!  I’ve experimented and added dried fennel seeds and played around with it.  It never fails!


INGREDIENTS:

  • 3 lb. boneless chuck roast (or whatever else you like.  I’ve used bottom round roasts as well)
  • 1 1/2 cups water
  • 1/3 cup soy sauce
  • 1 tsp. dried rosemary leaves
  • 1 tsp. dried thyme leaves
  • 1 clove garlic, finely chopped (I’ve used garlic powder in the past)
  • 1 dried bay leaf
  • 4 peppercorns
  • 2 loaves (1 lb. each) French bread (just estimate here)

DIRECTIONS:

  1. If beef roast comes in netting or is tied, do not remove.  In 3.5-4 quart slow cooker, place beef.
  2. In small bowl, mix remaining ingredients except bread, pour mixture over beef.
  3. Cover and cook on low setting 7-8 hours (this depends on your slow cooker, mine only took 4 hours on low!)
  4. Skim any fat from surface of juices in slow cooker, discard bay leaf and peppercorns.
  5. Remove beef and place on cutting board.  Remove netting, if applicable.
  6. Cut beef into thin slices and place on cut bread.  Serve with broth for dipping!

Greek Moussaka * (Not IC Safe)

moussaka1 moussaka2


I have always wanted to make moussaka and finally did it!  I just defrosted a piece I froze and it came back beautifully with full flavor!  It’s an awesome dish with loads of distinctive flavor.  I must say I don’t usually use eggplant in a way that works for me, but this dish does!  It almost tastes like perfectly roasted green pepper.  It is an effort to make but extremely worth it!  I got this off food.com, #88804.  I used a 13×9″ pan and I’m glad I did!  Good luck!

INGREDIENTS:

**Known IC irritants, tread carefully!

CHEESE SAUCE

DIRECTIONS:

  1. Grease a 9 x 9-inch baking pan although you could use a 13 x 9 pan using a smaller pan will result in a thicker casserole.
  2. Peel the eggplants then slice 1/4-inch thick (or a little thicker won’t hurt).
  3. Brush cookie sheet with olive oil.
  4. Coat each side of sliced eggplant with olive oil then season slices with salt and freshly ground pepper (I use seasoned salt for this and use as much pepper as desired).
  5. Place the eggplant slices on cookie sheet; broil under the broiler until brown; turn and broil the other side, brushing with oil if needed; repeat with all eggplant slices.
  6. In the bottom of the prepared baking dish arrange half of the eggplant slices.
  7. In a large skillet, combine beef and onions; cook stirring until the beef is no longer pink and the onions are soft; drain fat.
  8. Add in the garlic, tomato sauce, oregano, 1/2 tsp salt and black pepper to taste; pour mixture over eggplant slices.
  9. Arrange the remaining eggplant slices over the beef mixture.
  10. PREPARE THE CHEESE SAUCE: Melt the butter in a saucepan, whisk in flour, 1/2 tsp salt and pepper to taste; gradually stir in half and half or milk, cook and stir over medium heat until thick and bubbly.
  11. In a small bowl, beat egg; stir in some of the hot sauce, then add egg to sauce mixture, mix well; add in Parmesan cheese, and stir again.
  12. Pour the cheese sauce over mixture in baking dish.
  13. Bake in a preheated 350 degree F oven for 45 minutes.
  14. Cut into squares.
  15. Note: If doubling this recipe to serve 8 it is best to make two separate casseroles instead of one larger one.

Mexican Huaraches * (Not IC Safe)

huaraches huaraches2


I’m very proud of my Mexican huaraches. 🙂  After having them at a local restaurant, I really wanted to build the confidence of making them myself.  As it turns out, the huarache, or “sandal” shaped dough, is quite easy to make!  Once cooked you can top them with your veggies and meat to your liking.  ENJOY!!

I got this recipe from hispanickitchen.com.  Thank you!
INGREDIENTS:
Huarache ingredients:

  • 3 cups masa harina flour
  • 1 tsp. salt
  • 2 tsp. garlic powder
  • 2.5 – 3 cups warm water, plus more for shaping huaraches
  • 1/8 cup olive oil, plus more for cooking huaraches

Steak ingredients:

  • 2 strip steaks (1 lb. total)
  • Salt, to taste
  • Freshly cracked pepper, to taste**
  • Granulated garlic, to taste
  • Olive oil

Garnishes (optional):

  • Diced onion**
  • Chopped cilantro**
  • Grated or crumbled queso fresco or panela cheese
  • Avocado slices
  • Salsa**
  • Etc

**Known IC irritants, tread carefully!

DIRECTIONS:

1. In a bowl, add the masa harina, salt and garlic powder. Gradually add in the water until the masa dough forms. If it’s too dry, add a little more water. Work in the oil. Make 6 equal size masa balls, cover with plastic and set aside for 20 minutes.

2. Season the strip steaks with salt, pepper and garlic powder to taste on both sides. Drizzle with a little olive oil, set aside. Grill the steaks for 4 minutes per side on preheated grill pan. Remove from grill onto baking pan, tent loosely with foil paper and keep warm at low temperature in the oven.

3. While the steaks are cooking, preheat a comal or griddle pan to medium heat for 5 to 6 minutes. Take one masa ball and form it into an oval shape. Use a little water to wet the masa so it’s easier to shape. Place the masa in between plastic or wax paper and using a tortilla press or rolling pin, gently press or roll out to extend the oval shape until it looks like a huarache. It should be about 7 inches in length or so.

4. Transfer to the hot comal and cook for about 30 seconds per side or until it comes loose from the comal, then you know it’s ready to turn. Once you turn it, drizzle a little oil onto the huaraches so they start to crisp up. Turn after a 20 seconds and cook the other side for another 10 seconds. You don’t want to leave them on too long or they will get tough. Top the huaraches with salsa, grated cheese, steak and your favorite garnishes.

Notes: For a variation, when making the masa balls, flatten it in the palm of your hand and add a couple of tablespoons of refried beans, fold the dough over the beans to cover and form into oval shape as instructed. The beans will kind of fuse right into the masa as it cooks. If preparing these for the first time, I would suggest making the huarache shells first and then just warming them right before serving. It makes things a lot easier.

Easy Taco Seasoning * (Not IC Safe)

taco seasoning


This is an easy way to avoid buying those taco seasoning packets.  If you can make it yourself, why not!  I had all the ingredients on hand in my vast spice cabinet, so I whipped this up.  It smells very authentic!  🙂

INGREDIENTS:

  • 1 tablespoon chili powder**

  • 1/4 teaspoon garlic powder

  • 1/4 teaspoon onion powder**

  • 1/4 teaspoon crushed red pepper flakes**

  • 1/4 teaspoon dried oregano

  • 1/2 teaspoon paprika**

  • 1 1/2 teaspoons ground cumin**

  • 1 teaspoon sea salt

  • 1 teaspoon black pepper**

**Known IC irritants, tread carefully!

DIRECTIONS:


  1. In a small bowl, mix together chili powder, garlic powder, onion powder, red pepper flakes, oregano, paprika, cumin, salt and pepper.
  2. Store in an airtight container.

Homemade Burritos That Save a Lot of Money! * (Not IC Safe)


burrito1

I took a standard burrito recipe that was a little too plain for us and made it my own.  This will be a simple recipe with no ingredient amounts; experiment with that yourself and to your own tasting.  

First, I heated up some red salsa (I chose mild for our taste), and mixed it with some cooked brown rice I had just made.  You can, of course, use white rice too.  I heated the salsa and rice on the stovetop and added garlic powder.  Then, I added some rinsed and dried fresh cilantro with my can of rinsed and drained black beans.  (Please rinse your cilantro as it can be quite gritty and dirty – I used my salad spinner).  I sprinkled on some taco seasoning and added cumin and heated thoroughly.  I grilled my thin steak, chopped it, and added it to my pot.  (On our second try of making this recipe, we added cooked chorizo to the burrito and it really added so much flavor in addition to the steak!)  I turned off the burner and let the mixture cool about five minutes.  

burrito2

I put my meat/rice/bean mixture onto the bottom 1/3rd of my large burrito shell.  (Later I found out that shell is 310 calories, so next time I will use a slightly smaller size).  I added some shredded Mexican cheese along with some Queso Fresco on top of the mixture.  I topped that off with some of the freshly cleaned and dried cilantro.  Wrap tightly in burrito shell and wrap in foil.  I put some in the fridge for lunch that day and some in the freezer – first wrapped in the foil and then placed in a freezer bag.    

burrito3

It should look like this.  If you’re frugal like me, you’ll notice the foil doesn’t get very messy once you unwrap your burrito.  So I am saving my foil in the freezer and reusing it for the next burrito batch. 🙂  

burrito4


The final product – delicious and very filling!  Expect many compliments!!


Prosciutto & Parmesan Rolled/Stuffed Chicken *

prosciutto-chicken1

prosciutto-chicken2


What a great, simple recipe!  It was fun to roll and make!  It has a very deep, gourmet flavoring.  *Even though it says 4 boneless chicken breasts, I had to halve the breasts first because they were too thick. As you can see by the 2nd photo, it makes great and attractive leftovers.  From “Frugal Foodie” cookbook. 


INGREDIENTS:

  • 4 boneless chicken breasts*
  • 4 slices prosciutto
  • 4 T. Parmesan cheese, grated
  • 8-12 basil leaves —–(I put 3 leaves into each)
  • 1/4 cup all-purpose flour
  • salt, to taste
  • 3 T. olive oil
  • 1 1/2 cups white wine or chicken stock**

    **If you use wine, it will not be IC safe.  Use a safe chicken stock. Please also check prosciutto’s ingredients to be safe!


DIRECTIONS:

  1. On a cutting board, pound chicken breasts flat with a kitchen hammer.
  2. Place 1 slice prosciutto, 1 T. Parmesan, and 2 basil leaves on each breast.  
  3. Roll up chicken breasts and secure with wooden toothpicks. 
  4. Roll each breast through flour to lightly coat, season with salt.
  5. In a large pan heat olive oil and saute chicken over medium heat until golden brown on all sides.
  6. Add 1 cup wine/chicken stock to pan, cover and reduce heat.  Simmer 15-20 mins, turning several times, until chicken is tender and cooked through.
  7. Remove from pan, increase heat and add remaining 1/2 cup of wine/chicken stock.  
  8. Deglaze skillet and reduce liquid to form sauce.  
  9. Season with salt, spoon over chicken, and serve. (I recommend letting it rest for 10 mins. though before serving). 


Tangy and Moist Meatloaf * (Not IC Safe)

meatloaf-with-half-and-half


We love this recipe!  It delivers moist and tangy meatloaf that will make you and your guests want more!  We used 1/2 and 1/2 and I used onion powder.  I added 3 T. of brown sugar to the top.  I used 90% lean ground beef.  I used my meatloaf pan so that the meat doesn’t sit in all of the oil and juices.  The meatloaf pan had about 1/4″ of fat and juices in the bottom.  I highly recommend that pan!  Enjoy!

INGREDIENTS:

Meatloaf:

  • 1 1/2 lbs ground beef (ground shoulder roast is good)
  • 1 slice bread (broken or chopped finely)
  • 1 egg
  • 1 small vidalia onions or 1 small type sweet onion, finely chopped**
  • 1 teaspoon table salt
  • 1/4 teaspoon black pepper**
  • 4 tablespoons ketchup**
  • 1/2-2/3 cup whole milk or 1/2-2/3 cup half-and-half

Sauce

  • 4 tablespoons apple cider vinegar**
  • 2 -4 tablespoons dark brown sugar, packed firm (to taste)
  • 1/2 cup ketchup**

**Known IC irritants, tread carefully!

DIRECTIONS:

Meatloaf:

  1. Spray loaf pan or meatloaf pan.  Combine meat loaf ingredients and place into a loaf baking dish.
  2. Smooth out top.
  3. Sauce: Combine sauce ingredients and pour on top and sides of meatloaf.
  4. Bake at 350°F about 1 hour to 1 hour 15 minutes or until done.

Other tips:

  • The addition of 1 or 2 teaspoons of Kitchen Bouquet® makes this recipe very good.
  • Recipe should be”plump” from the addition of the milk or Half & Half.  It should NOT be runny.
  • A second batch of sauce served hot is good to serve with the meatloaf.

Read more about this recipe at Food.com.

Balsamic Pork Tenderloin in the Slow Cooker * (Not IC Safe)

balsamic-pork2


balsamic-pork1

This is a fantastic recipe for slow cooker pork tenderloin marinated in balsamic vinegar plus other marinades and spices.  It’s from the Add a Pinch website, link below.  I loved the flavor and sauce!  I really liked that it didn’t smell too “porky”, I’m sensitive to smells and they turn me off.  I used garlic powder just fine.  It took 5 minutes to prepare and was just a waiting game.  On low it took about 4-4.5 hours.  It was even easy to shred!  YUM!

Author: Robyn Stone | Add a Pinch
Serves: 6-8
Ingredients
  • 1 2-3 pound boneless pork tenderloin
  • 1 cup chicken or vegetable broth
  • ½ cup balsamic vinegar**
  • 1 tablespoon Worcestershire sauce**
  • 1 tablespoon soy sauce**
  • 1 tablespoon honey
  • ½ teaspoon red pepper flakes**
  • 2 cloves garlic, chopped

**Known IC irritants, tread carefully!

Instructions
  1. Place pork tenderloin into the insert of your slow cooker. In a 2-cup measuring cup, mix together all remaining ingredients. Pour over pork and set the timer for your slow cooker. (4 hours on High or 6-8 hours on Low)
  2. Once pork tenderloin has cooked, remove from slow cooker with tongs into a serving dish. Break apart lightly with two forks and then ladle about ¼ – ½ cup of gravy over pork tenderloin.
  3. Store remaining gravy in an airtight container in the refrigerator for another use.

http://addapinch.com/cooking/2013/07/12/balsamic-pork-tenderloin-recipe/