“Huck Finn Clone” Chicken Caesar Pita *

I’m obsessed with a Huck Finn Donut’s dish called “Chicken Caesar Pita”.  I’ve spent too much money buying it in the restaurant over and over again.  One of my friends loves it too.  I don’t need the fries or the fruit cup, so it’s not the best deal in the restaurant to order this dish AND it’s kind of simple, so why not make it at home?  It came out shockingly close to the restaurant meal!

The following ingredients are for 2 servings.  
INGREDIENTS:

  • About 1 large boneless skinless chicken breast,  (Make sure it’s filleted so it cooks evenly and quickly)
  • Coarse salt, onion powder, garlic powder*
  • Vegetable oil
  • 2 Kronos pitas (not pita pockets)
  • Shredded lettuce
  • Chopped tomato, IF tolerated*
  • Caesar salad dressing, or Italian dressing**
  • 2-3 thick slices of Swiss cheese

NOTES:

–Onion powder can be irritating to IC patients, please tread carefully.

–Tomato is a known irritant but some can tolerate it.  I can longer tolerate it.

–I used to make this recipe with bottled dressing but can no longer tolerate it.  Now I use honey and olive oil.  If you can tolerate it, try Ken’s Italian and Romano / or Ken’s Caesar dressing. It is fabulous.

DIRECTIONS:


  1. Begin by heating pan with vegetable oil, on medium heat.
  2. Fillet your boneless skinless chicken breast if necessary.  Pat dry.
  3. Season the chicken on both sides with coarse salt, onion powder, and garlic powder.
  4. Once the oil in pan is heated, add chicken breasts, flip after chicken is browned on one side, and cook thoroughly until at least 165* F.
  5. Remove to a clean plate and let chicken rest 5-10 minutes.
  6. While the chicken is resting, add your 2 pitas to the pan that has residual oil and heat.  Remove pitas to clean plates ready to serve.
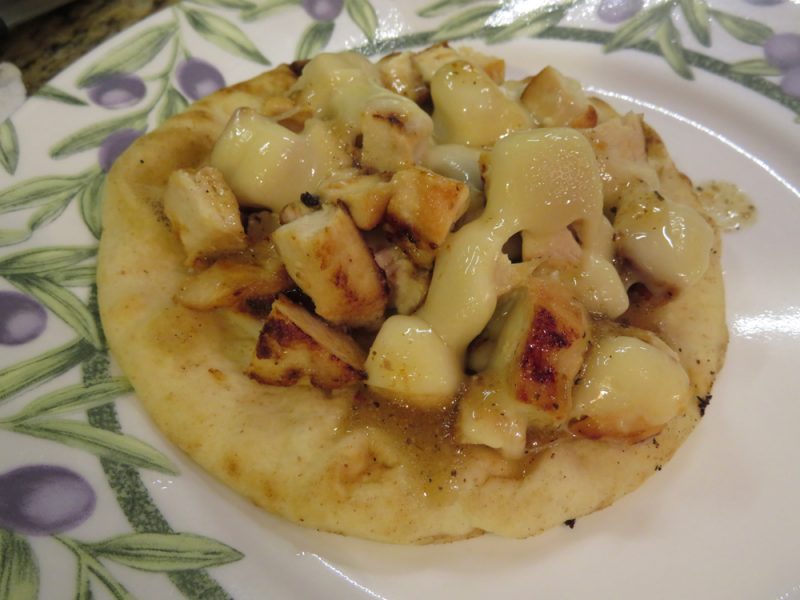
  7. Chop chicken into bite-sized pieces.  Add back to pan and cover with desired amount of Swiss cheese slices.  Let cheese melt 2-3 minutes onto chicken.
  8. Add cheese-covered chicken to top of warmed pitas.
  9. Place chopped tomato and shredded lettuce on top of chicken pita.
  10. Drizzle Caesar or Italian dressing to top of veggie-covered chicken pita. If you can’t tolerate bottled dressing like I cannot, try a drizzle of honey and olive oil.
  11. Serve warm.


Print Friendly, PDF & Email

Delicious Popcorn Balls *

We made these popcorn balls coincidentally around Valentine’s Day and it was serendipitous.  They come together fast and are more forgiving than Rice Krispie treats that harden faster than you can stir!  The marshmallow mixture stays pliable for a while.

We made the popcorn in our air popper and had to make two batches.

We used unflavored peanuts – just plain works well here.  No one wants garlic/onion flavored popcorn balls.  If you do, I don’t know you anymore!

You can add toasted slivered almonds or chopped peanuts too. I love adding chopped peanuts – about 1/2 to 3/4 cup is perfect.


INGREDIENTS:

  • Cooking spray
  • 14 heaping cups plain popped popcorn
  • 6 TBSP. unsalted butter
  • One 10.5 oz. package mini marshmallows
  • 2 TBSP. light brown sugar
  • 1 tsp. vanilla extract, IF TOLERATED
  • 1 tsp. salt
  • 3/4 cup chopped salted peanuts or toasted slivered almonds, optional but great
  • Sprinkles!  Red, blue and white for 4th of July?  Red and green for Christmas?  FUN!, optional
  • 1/2 cup to 3/4 cup plain chopped peanuts, optional


DIRECTIONS:

  1. Remove any un-popped kernels from the popped popcorn.  Lightly grease a large mixing bowl with cooking spray and add popcorn, set aside.
  2. Melt butter in a large saucepan over medium heat.
  3. Add marshmallows, brown sugar, vanilla, salt, and cook stirring, until marshmallows have melted and mixture is smooth, 4-5 minutes.
  4. Pour marshmallow mixture over popcorn, along with peanuts (or almonds), if desired.
  5. Mix with 2 lightly greased rubber spatulas until popcorn is evenly coated.
  6. Using clean, greased hands, form mixture into 2 1/2 inch balls.
  7. Eat immediately or wrap each ball tightly in plastic and keep up to 5-7 days.
Print Friendly, PDF & Email

Old School Simple Rice Pudding *

The photos can’t possibly do this rice pudding justice, but it’s the best I’ve ever made!  I highly recommend making this at least 6-12 hours before you are serving it, preferably a day ahead of time.  When it’s fully chilled, the flavor really deepens and becomes perfectly sweet and creamy.  Just believe me!  I use homemade vanilla and I doubled the amount of vanilla I added.

As of 3/2018, I can no longer tolerate vanilla or cinnamon.  So, I omit these and it still turns out good, but not as flavorful, of course.

INGREDIENTS:

  • 3cup medium grain rice or 34 cup long grain rice
  • 1 1cups water
  • 1teaspoon salt (heaping)
  • 4 cups whole milk (I use 2%)
  • 1cup sugar
  • 1teaspoon vanilla*
  • cinnamon (optional)**
  • whip cream (optional)

NOTES: *Vanilla can be an irritant to some, I had to stop using it.  

**Cinnamon is a known irritant, remove if it bothers you. 

DIRECTIONS:

  1. Bring rice, water and salt to a boil over med-high heat.
  2. Simmer covered until water has been absorbed (approximately 15 minutes).
  3. Stir in milk and sugar and cook uncovered over medium heat for 30-40 minutes, stirring frequently–especially towards the end of cooking.
  4. The pudding is done when the rice and milk have amalgamated into a thick porridge-like consistency.
  5. DO NOT OVERCOOK or the pudding will be solid instead of creamy once cooled.
  6. Remove from heat and stir in vanilla.
  7. Pour into a bowl or cups. (I use ramekins for a nice portion).
  8. You can sprinkle cinnamon on the top if you like.
  9. COVER with plastic wrap directly on surface “IF” you don’t want a skin.
  10. CHILL approx. 6 hours or more, preferably overnight for best flavor.  Serve with whip cream if desired.
Print Friendly, PDF & Email

Spinach and Ricotta-Stuffed Shells (Has Tomato) *

This is really good.  It smells like an Italian restaurant.  If you need to reduce the calories or fat, just substitute part skim ricotta instead of whole fat ricotta.  It’s creamy and wonderful.  Don’t skip the broiler step as it slightly chars the shredded mozzarella topping and gives it a great flavor!  Next time, I’d chop some fresh parsley on top.  

Warning: This recipe is fantastic but it’s not IC safe, given it has tomatoes.  I made sure it isn’t tagged “I.C. Bladder Safe”.  If you can tolerate tomato in quantity, try it.  I used to be able to eat this, now that my IC has worsened, I can’t even have one bite.  

INGREDIENTS:

  • 20 jumbo pasta shells (about half a 12-ounce box)
  • One  24-ounce jar marinara sauce
  • Two  15-ounce containers ricotta
  • 2 cups baby spinach, chopped
  • 1/2 cup grated Parmesan (2 ounces)
  • kosher salt
  • 1/2 cup grated mozzarella (4 ounces)


DIRECTIONS:

  1. Set an oven rack to the highest position and heat oven to 400° F.
  2. Cook the pasta according to the package directions. Drain and run under cold water to cool.
  3. Spread the marinara sauce in the bottom of a large broiler-proof baking dish.
  4. In a bowl, combine the ricotta, spinach, Parmesan, ½ teaspoon salt.
  5. Spoon the mixture into the shells and place them on top of the sauce.
  6. Sprinkle the shells with the mozzarella and bake until heated through, 10 to 12 minutes.
  7. Increase heat to broil. Broil the shells until cheese begins to brown, 2 to 5 minutes.
  8. Serve with the salad, if desired.

NOTE: If you want to sneak in an extra helping of green vegetables into this dish, chop up cooked green beans, broccoli, or asparagus and fold it into the ricotta mixture along with the spinach.  

Print Friendly, PDF & Email

Food.com’s Honey BBQ Chicken Wings * (Not IC Safe)


I will never lose this recipe.  It makes perfect honey BBQ chicken wings.  They are to die for.  It’s a perfect sauce and just enough sweet and savory flavors.  I won’t try another chicken wing recipe!  Just make them and you’ll see for  yourself! 🙂

For anyone sensitive to spicy foods or who has an I.C. bladder like me, I omitted the cayenne and hot sauce and it turned out just perfect!

INGREDIENTS:

  • 18 chicken wings, that have tips discarded, and have been split into two parts: the drumette and the wingette.
  • 1 teaspoon kosher salt
  • 1 teaspoon garlic powder
  • 1teaspoon sugar
  • 1teaspoon paprika**
  • 1teaspoon black pepper**
  • cooking spray

    SAUCE INGREDIENTS:

  • 1 cup barbecue sauce, preferably Hickory Smoke Flavor**
  • 1cup honey
  • 2 tablespoons ketchup**
  • 2 tablespoons hot sauce**
  • 4 tablespoons butter
  • 1teaspoon garlic powder

**Known IC irritants, tread carefully!

DIRECTIONS:

  1. Preheat the oven to 375.
  2. Season the wings with the salt, garlic, pepper, cayenne, sugar, and paprika.
  3. Spray a cookie sheet with a generous spray of cooking spray.
  4. Place the wings in a single layer on the cookie sheet, and place in the oven.
  5. Cook for 35-40 minutes, depending on the size of the wings, turning once.
  6. While they are baking, make the sauce by slowly simmering the sauce ingredients over the lowest heat.
  7. When the wings are done baking, carefully dip them in the sauce, and place them back in the oven for another 5 minutes, or until the sauce is bubbling.
  8. ENJOY!


Print Friendly, PDF & Email

Eggless Banana (Orange Or Apple) Nut Muffins

SAMSUNG CAMERA PICTURES

These are tried and true banana orange nut muffins.  I’ve been making them OVER 15 YEARS so that says something!   This is a recipe from Rosemarie Emro’s cookbook “Bakin’ Without Eggs”.  This cookbook is sometimes hit or miss for me but it has produced some amazing eggless desserts (cookies and cheesecake, and waffles)!  


TIPS:

–Be sure to use quality plain peanuts, without added spices like onion, garlic, and flavoring.  Also, you can try a different nut like chopped cashews, etc.

–Use 100% quality orange juice, preferably not from concentrate.

–Use ripe bananas that are at the perfect mashable stage.  

–Use metal baking pans, avoid nonstick.  Yes they may cost more and are harder to find, but they will last forever and have better heat distribution.  Check Amazon.com or Williams-Sonoma.  

–Use muffin liners for the easiest cleanup ever!


INGREDIENTS:  (makes 12-15 muffins)

  • 2 1/4 cups all-purpose unbleached flour
  • 1 cup sugar
  • 2 tsp. baking powder
  • 1 tsp. baking soda
  • 1//4 cup vegetable oil
  • 1 cup orange juice or apple juice
  • 2 ripe bananas, mashed
  • 1/2 cup nuts , finely chopped (optional) <—We use plain peanuts here

DIRECTIONS:

  1. Preheat oven to 400°F.
  2. Lightly butter a 12 compartment muffin tin – Or use muffin liners like I do, for the easiest cleanup ever.
  3. In a large bowl, combine flour, sugar, baking powder and baking soda.  Stir until dry ingredients are mixed.
  4. Stir in oil, orange juice (or apple juice), mashed bananas, and nuts (if using) until smooth. (You don’t need an electric mixer for this recipe).
  5. Spoon prepared muffin batter into muffin liners, filling half full.
  6. Bake for 15-20 minutes or until browned on top.  Check at 15 minutes with the toothpick test, if not done, add another 5 minutes, and re-check.
  7. Remove and let cool in pan on wire rack.
Print Friendly, PDF & Email

Easier Garlic Cheesy Flatbread

I have posted another garlic cheese flatbread before, which involved making your own dough.  While it’s tasty, that recipe does have a bit of waiting and work involved.  Tonight I tried the same theory but with refrigerated pizza crust.  It tasted just as good, if not better!  Hooray.  So here is the recipe that saves a lot of time!

OLD RECIPE:  If you want to see my previous recipe, with the homemade dough, click here.  It takes longer, but if you don’t have refrigerated pizza dough on hand, it’s a great recipe!

You will find the refrigerated pizza crust near where your grocer keeps refrigerated biscuits and crescent rolls.


INGREDIENTS:

  • 13.8 oz. refrigerated pizza crust
  • 2 tablespoons unsalted butter, melted/softened
  • 1 tablespoon garlic powder
  • 1/4 cup grated Parmesan cheese
  • 1 cup+ shredded mozzarella or Italian blend cheese (add as much as you want!)
  • OPTIONAL but great:  Any Italian spices you prefer: basil, oregano, Italian seasoning, etc.

DIRECTIONS:

  1. Preheat oven to 350* F.
  2. Prepare your 17″ x 11″ baking sheet pan by putting aluminum foil on the bottom of it.  Lightly spray with any cooking spray like PAM so your dough doesn’t stick.
  3. Remove refrigerated pizza dough from packaging.  Use a rolling pin to roll to a suitable size to fit into the  17″ x 11″ baking sheet pan, previously mentioned.
  4. Spread melted or softened butter on the top of the raw dough.
  5. Sprinkle with garlic powder, Parmesan cheese, and mozzarella/Italian blend cheese.  Add spices if desired.
  6. Bake for approximately 20 minutes, or until golden brown and cheesy looks bubbly (and happy).
  7. Cut into slices and serve! 🙂


Print Friendly, PDF & Email

Easy Banana Muffins *


INGREDIENTS:

  • 3 large bananas (ripe, preferably with brown spots)
  • 1/2 cup white sugar
  • 1 egg (or use egg-replace like “Neat Egg” like we did), slightly beaten
  • 1 teaspoon baking soda
  • 1 teaspoon baking powder
  • 1 1/2 cups all-purpose flour
  • 1/3 cup melted butter
  • 1/2 teaspoon salt
  • chopped nuts (optional, but great) —Think walnut, cashew, peanut, etc. I used cashew, it was fantastic. **
  • Chocolate chips (optional)**

**Chocolate chips are not IC safe so please substitute or omit.

**Use unflavored nuts!  If you don’t check, you may purchase peanuts that have onion and garlic flavors in them.  Check your ingredient label.


Pro Tip:  if you want to save money, buy your nuts at ALDI or pay the price, literally.  I love all their nuts that I can have, but I especially love their giant, plump cashews.
DIRECTIONS:

  • Mash bananas with a fork.
  • Add sugar and the slightly beaten egg.
  • Stir in melted butter.
  • Stir in dry ingredients: baking soda, baking powder, flour, salt, nuts, and chocolate chips.
  • Put liners in your medium size muffin pans.  Spoon batter into your liners.
  • Bake approximately 20 minutes at 350* F.
  • Use a toothpick to check for doneness – also, they should be slightly golden brown.
Print Friendly, PDF & Email

Eggless & Milk-Free Chocolate Cupcakes * (Not IC Safe)

moms-chocolate-cupcakes

Here’s a fantastic milk-free and eggless chocolate cupcake.  If I made this for you, you would not know it’s missing those two ingredients.  I prefer this to the ends of the Earth over a grocery store, chemical-laden, high-sugar, no-flavor cupcake!

Get this – all these ingredients are shelf stable!  They will last a long time so this means you can always whip up cupcakes or a cake within minutes without running to the store!

For me, it made 14 cupcakes.

INGREDIENTS:

  • 1 1/2 cups flour
  • 1 cup sugar
  • 1 teaspoon baking soda
  • 1 teaspoon salt
  • 1/3 cup cocoa powder**
  • 1/2 cup oil
  • 1 cup water
  • 1 teaspoon vanilla extract**
  • 1 tablespoon vinegar**

**Known IC irritants, tread carefully!


DIRECTIONS:

  1. Preheat oven to 350* F.
  2. Mix all ingredients together until moist and well blended.
  3. Pour batter in cupcake liners, in pan, and bake for 20-25 minutes at 350* F. (For me, it took at least 25 minutes!  Make sure you bake them long enough or they won’t release from liners).
  4. Let cool and frost with your favorite icing.

If instead you want to make a layer cake, double the recipe above and evenly pour into 2 round cake pans.  Increase baking time to about 35 minutes or until a toothpick inserted in the center comes out clean.


Print Friendly, PDF & Email

Pumpkin Spice Doughnut Holes – Food Network Magazine

img_1578

img_1581img_1579

img_1574


ABOVE:  Always let your egg come to room temperature for baking or frying (30 minutes), unless otherwise instructed.  In this recipe, the butter was eventually melted.  I left plastic wrap on these two ramekins because I had to leave the house for a short amount of time.  


img_1575 img_1576 img_1577

It’s nice to know doughnut holes are not that challenging to make.  I learned a lot making these.  The biggest learning curve was don’t let them cook too long.  Once they are brown, take them out.  If you leave them in further, they get a little bit of a burnt taste.

This was from Food Network Magazine – October/November 2016, most likely, edition.  Makes approximately 24 holes.


INGREDIENTS:

  • 1 3/4 cup flour
  • 2 teaspoons pumpkin pie spice
  • 1 teaspoon baking powder
  • 1 teaspoon salt
  • 1 egg
  • 2  tablespoons melted butter
  • 1/2 cup milk
  • 1/2 cup sugar
  • Good amount of vegetable oil for frying (a few cups, at least 3-4 cups)

For topping:

  • 1/3 cup sugar
  • 1 teaspoon pumpkin pie spice


DIRECTIONS:

  1. Whisk 1 3/4 cup flour, 2 teaspoons pumpkin pie spice, 1 teaspoon baking powder, and 1 teaspoon salt.
  2. Separately, whisk 1 egg, 2 tablespoons melted butter, 1/2 cup milk, and 1/2 cup sugar.
  3. Then stir in the flour mixture.
  4. Deep-fry small scoops (I used a cookie scoop) in 350* vegetable oil.  Turn doughnut holes, until golden, 3-4 minutes.  Don’t overcook or they will burn.
  5. Transfer to a wire rack to drain, over paper towels.
  6. Mix 1/3 cup sugar and 1 teaspoon pumpkin pie spice.  Roll doughnut holes in this mixture and set aside.
Print Friendly, PDF & Email