America’s Test Kitchen’s Roasted Carrots

ATK-roasted-carrots-12-2016-1 ATK-roasted-carrots-12-2016-2 ATK-roasted-carrots-12-2016-3 ATK-roasted-carrots-12-2016-4 ATK-roasted-carrots-12-2016-5

This is a beautiful recipe – three ingredients and perfection, thanks to America’s Test Kitchen.  The world is of the day is caramelization.  The perfection is in the preparation and precise directions, which are simple to follow.  Don’t judge, this beautiful dish is next to pizza rolls, and I don’t care what you think. 😉  This blog is for entertainment and sharing the love of cooking/baking, not to impress at every turn.

INGREDIENTS:

  • 1 1/2 lbs. carrots, peeled, halved crosswise, and cut lengthwise if necessary to create even pieces
  • 2 tablespoons unsalted butter, melted
  • Table salt and ground black pepper (freshly ground is always best)

DIRECTIONS:

  1. Adjust oven rack to middle position and heat oven to 425 degrees F.
  2. In large bowl, combine carrots with butter, 1/2 tsp. salt and 1/2 tsp. pepper; toss to coat.
  3. Transfer carrots to foil or parchment-lined rimmed baking sheet and spread in single layer.  (Use the largest baking sheet that you have.)
  4. Cover baking sheet tightly with foil and cook for 15 minutes.
  5. Remove foil and continue to cook, stirring twice, until carrots are well browned and tender, 30-35 minutes.
  6. Transfer to serving platter, season with salt and pepper to taste, and serve.


Yummy Garlic Bread in Bread Machine

garlic-bread-in-machine-11-2015

Garlic bread in the bread machine.  It sounds impossible, but it isn’t at all!  I made this at Thanksgiving and it came together so quickly.  It’s a fast recipe!  The only rule is to make sure you follow your bread machine’s directions of adding the ingredients in the correct order.  Most state liquid ingredients on the bottom of the bread pan, dry ingredients in the middle, and make a little well in the dry ingredients on the top, and put your yeast there.  Don’t let your yeast touch the wet ingredients on the bottom.

INGREDIENTS:

  • 1 cup warm water (110 degrees F)
  • 1 tablespoon butter (use unsalted to control the salt)
  • 1 tablespoon dry milk powder
  • 1 tablespoon white sugar
  • 1 1/2 tsp. salt
  • 1 1/2 tablespoons dried parsley (dried is fine)
  • 2 tsp. garlic powder (use your freshest garlic powder for best results)
  • 3 cups BREAD flour
  • 2 tsp. active dry yeast

DIRECTIONS:

  1. Place ingredients in the pan of the bread machine in the order recommended by the manufacturer.  (Most bread machines state this order, but check your manual first!!
    Liquid ingredients on the bottom of the bread pan
    Dry ingredients in the middle
    And make a little well in the dry ingredients on the top, and put your yeast there.  Don’t let your yeast touch the wet ingredients on the bottom.)
  2. Select basic bread cycle and 2 lb. loaf, press Start.

Peach Blueberry Banana Smoothie *

This is a ‘recipe’ for a very tasty smoothie that I discovered myself.  Smoothies don’t need a recipe, you just need complimentary flavors and enough liquid.  No pic of the actual result this time, it was so good it was gone in moments. Just imagine a purple smoothie.  No measurements needed, eyeball this one!  Play with the amounts of ingredients.  It will be fine!

INGREDIENTS:

  • 1 peach, room temp. or refrigerated, cored and sliced
  • Approximately 1/3 cup to 1/2 cup frozen blueberries
  • Approximately 1/2 cup frozen sliced bananas**
  • Approximately 1 cup 2% (or your choice of fat) milk

Make sure these fruits are safe for  you!  They are IC safe for some.

DIRECTIONS:

  1. Pour your milk into the blender.
  2. Add your peach slices, frozen blueberries, and frozen slices of bananas.
  3. Cover with lid and process until super smooth – about 45 seconds to a minute.  (We love our NutriBullet much more than traditional blenders.  It makes the ingredients pulverized into super fine bits.  Even fruit seeds are no longer annoying to eat)
  4. If the smoothie gets too thick or the blender struggles, turn off blender, and add more milk, cover, and re-process.
  5. Enjoy!!

** When your banana is too ripe or on it’s way out, take off the peel, and slice it up.  You have two choices:

1) You can be lazy like I am sometimes and throw your banana slices into a Ziplock bag and put it in the freezer.  This works better for bananas than berries.  Bananas will freeze and clump together but they’re still seperate-able.  With berries, I recommend #2.

2) With berries or if you have time to freeze bananas the right way: slice your bananas and lay them on a parchment paper or aluminum foil-lined plate, making sure they don’t touch.  Freeze them for a few hours (1-2 hours).  Then take them off the plate and put them in a freezer bag, and label.  Initially freezing them separately keeps them from becoming a massive berry lump!  I’ve been there and learned the difficult way. LOL

ATK Buttermilk-Ranch Pita Chips *

pita-chips-1

pita-chips-3

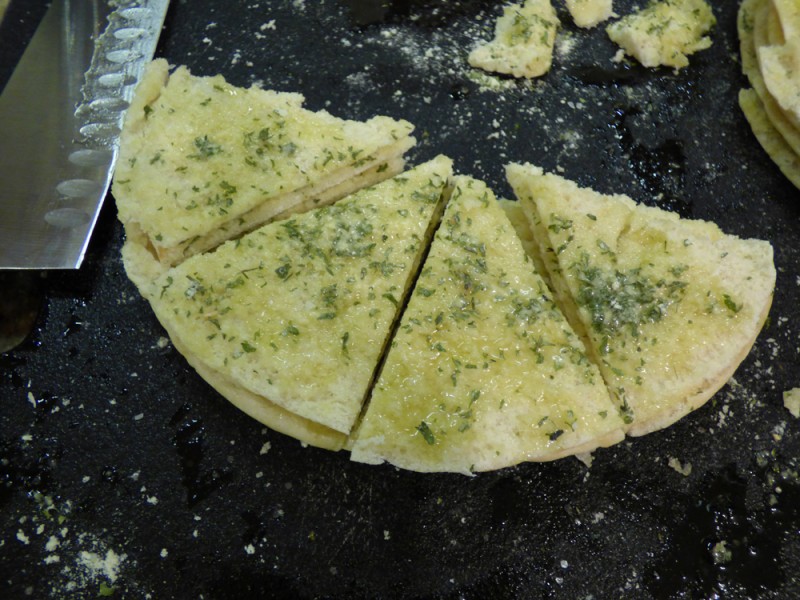
ABOVE: Use pita pockets for easiest cutting.  I have made this recipe twice and using the pita pockets was infinitely easier to cut and resulted in uniform thickness chips versus cutting a non-pita pocket myself.

pita-chips-4

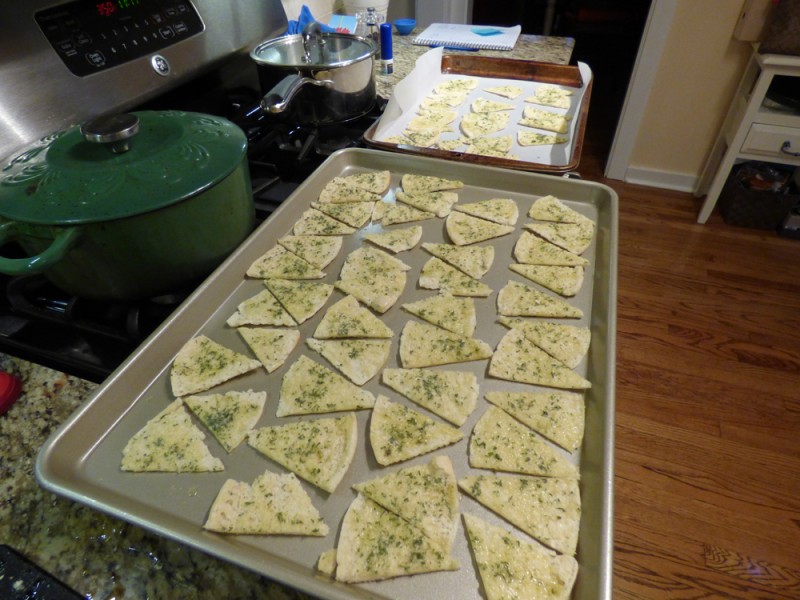
(ABOVE: Alternate wedges in order to fit maximum number of chips on the pan).

Buttermilk-powder-I-like

(ABOVE: The brand I buy for buttermilk powder).


I just subscribed to the three website deal on Americastestkitchen.com, that includes access to Cook’s Country website and Cook’s Illustrated.  So, you may be seeing a lot of these recipes from now on, since they are such a trusted source I will be making many of them.  I saw this recipe on the Cook’s Country website and had to try it immediately!  Everyone that has tasted it has ranted and raved about it.

Buttermilk powder is in the baking aisle at your larger, well-equipped stores.  It was maybe $5-6 and I had just bought it a month before this recipe came along for those instances where you need 1 cup of buttermilk and don’t want to buy a $4 container and have the rest go to waste.

****I had just run out of dried dill, it had lost all flavor and I threw it out.  So I went with dried parsley and it was fantastic!

Note: Use good quality extra-virgin olive oil here as this recipe uses a bit of it and it’s a major component!

Note #2: You can use regular or whole-wheat pita bread here.

Serves 8

INGREDIENTS:

  • Four 8″ pita breads (if you want to make life easy, but the pocket style!)
  • 1 T. buttermilk powder (see photo above)
  • 2 tsp. dried dill****
  • 1 tsp. kosher salt
  • 1/4 tsp. garlic powder (not salt)
  • 1/4 tsp. onion powder (not salt)**
  • 1/2 cup extra-virgin olive oil

**Onion can irritate some people, be careful.


DIRECTIONS:

  1. Adjust oven racks to upper-middle and lower-middle positions and heat oven to 350 degrees F.
  2. Using kitchen shears, cut around perimeter of each pita and separate into 2 thin rounds.
  3. Combine buttermilk powder, dill (or parsley), salt, garlic powder, and onion powder in bowl.
  4. Working with 1 round at a time, brush cut side generously with olive oil and sprinkle with spice mixture.
  5. Stack round on top of one another, cut side up, as you go.
  6. Using chef’s knives, cut pita stack into 8 wedges.
  7. Spread wedges, cut side up and in single layer, on 2 rimmed baking sheets. (See my photo for alternating pita chips on baking sheet to get maximum number of chips on each sheet).
  8. Bake until wedges are golden brown and crisp, about 15 minutes, rotating and switching sheets halfway through baking.
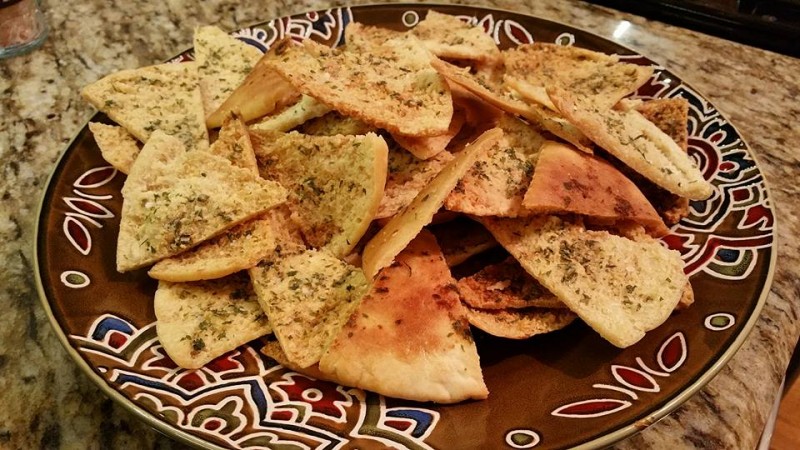
  9. Let cool slightly before serving. (They are best served slightly warm, but are great at any temperature!)


Mexican Nachos: Chicken, Black Beans, Salsa, Cheese, and More! * (Not IC Safe)

Mexican-bake-8-17-15

This finished dish never lasts more than two days in our house.  It’s that tasty.  It’s hard to even put it in the fridge, you just want more.  It’s a perfect meal: protein of the beans and chicken, carb of the tortilla chips, fat of the cheese (and optional sour cream), and veggies: salsa, green onion, and beans (which have fiber too).  It’s just perfect, believe me.  You can health it up by doing multigrain or high fiber tortilla chips.

—–I put some ground cumin on my raw chicken, pan-fried it with some olive oil (via the Misto), let it rest 5 mins, then I chopped it into bite-sized pieces.  I am not often a fan of shredding, it takes forever.

—–I used organic low sodium black beans.  If you only have regular black beans, drain and rinse them multiple times – it removes 40% of the salt!

Makes 6 servings

Prep Time 10 Mins.

Oven Time 15 Mins.


INGREDIENTS:

  • 6 oz. baked or regular tortilla chips (c’mon put some more in the pan, live a little. I did probably 10 oz.)
  • 2 cups (8 oz.) cooked shredded chicken
  • 1 can (15 oz) black beans, rinsed and DRAINED**
  • 1 cup jarred salsa or Picante sauce (or add more!)**
  • 1 cup shredded reduced-fat or regular Mexican cheese blend**
  • 4 scallions, trimmed and thinly sliced (I used green onions)**
  • Optional: sour cream as a topping right before serving
  • Optional variation: replace chicken and beans with 1/2 LB. coarsely chopped cooked shrimp and 1 can (8 oz.) drained crushed pineapple**

**Known IC irritants, tread carefully!

DIRECTIONS:

  1. Preheat oven to 350 degrees.
  2. If you do not already have your chicken cooked and ready, cook it now.  Let it rest a few minutes before chopping or shredding.
  3. Line bottom of a 13x9x2″ baking dish with tortilla chips.
  4. Scatter cooked chicken and beans over the chips.
  5. Spoon salsa over the beans and top with cheese and scallions (or green onions).
  6. Bake at 350 for 15 mins. until heated through and cheese is melted.
  7. Serve immediately!  (Who could wait anyway?)


Grilled Margherita Sandwiches


Grilled Margherita Sandwiches Cooking Light


I saw this recipe in my newest magazine subscription – Cooking Light.  “This quick five-ingredient entree transforms a favorite pizza combo into a melty grilled sandwich.  To thinly slice fresh mozzarella with ease, freeze the cheese for about 30 minutes before cutting.”.

We all know Margherita pizza is just a culinary delight, so this sandwich is wonderful.  Next time I will, a) use the panini press, b) I think the recipe forgot to say to seed your tomatoes, a very important step to avoid a soggy sandwich.

INGREDIENTS:

  • 1/4 cup lower-sodium marinara (I just used my Newman’s Own spaghetti sauce)
  • 8 (1 ounce) slices of whole-grain bread
  • 4 ounces fresh mozzarella cheese, thinly sliced
  • 1 large tomato, seeded, cut into 8 thin slices
  • 1/2 teaspoon freshly ground black pepper
  • 1/4 teaspoon kosher salt
  • 12 large fresh basil leaves
  • Cooking spray
  • 1 tablespoon olive oil, divided

DIRECTIONS:

  1. Spread 1 tablespoon marinara over 1 side of each of 4 bread slices.
  2. Top evenly with cheese and tomatoes.
  3. Sprinkle tomatoes evenly with pepper and salt.
  4. Top tomatoes with basil and remaining bread slices.
  5. Lightly coat sandwiches with cooking spray.
  6. Heat a large skillet over medium-low heat.  Add 1 1/2 teaspoons oil to pan, swirl to coat.
  7. Add sandwiches to pan, cook 2 1/2 minutes or until browned.
  8. Brush tops evenly with remaining 1 1/2 tsp. olive oil.
  9. Turn sandwiches over, cook 2 minutes or until browned.
  10. Serve immediately.
  11. (Alternatively, after step 5 you could use your panini press.)  


Super Easy Strawberry Banana Smoothie! * (Not IC Safe)

20150324_212116

This is my creation.  You can’t go wrong with this smoothie – it’s super simple and fast.  I put all the ingredients in my Ninja and it does all the work!  Sometimes we have this for breakfast, or as an afternoon snack, or even a few hours before bed.

All ingredients are approximations, you don’t even need to measure the fruit, just guesstimate, taste, and adjust if necessary.

Makes about two servings.  


INGREDIENTS:

  • One 6 oz. container Yoplait original French vanilla yogurt**
  • About a cup frozen strawberries (freeze them yourself, save money).**
  • About a cup frozen bananas, previously sliced into approximately 1/2″ pieces prior to freezing**
  • Cold water to thin, if necessary.

**Or use whatever your favorite yogurt is, whatever flavor would work with the fruit.  Greek yogurt will change the flavor, so remember that.  Be careful with Yoplait yogurt – if you buy the ‘light’ version, the package will say “No aspartame” but it surely has Splenda in it: look for sucralose, the other name for Splenda, in the ingredient list.  My husband gets horrid headaches from Splenda that last many hours, and I, with I.C. cannot have any fake sweeteners, or I will suffer.

DIRECTIONS:

  1. Pour yogurt into bottom of your food processor, add a little cold water (about a 1/4 cup), add your fruit.  Cover.
  2. Turn on your blender on low and process until your smoothie is thoroughly mixed.  Add additional cold water if mixture gets too thick.  If mixture is not flavorful enough, add more frozen fruit.
  3. Enjoy!

ATK’s Zucchini Bread *

americas-test-kitchen-zucchini-bread

This photo is courtesy of America’s Test Kitchen -Cook’s Illustrated.  My bread turned out slightly under-cooked and wasn’t as presentable as I normally like so I’ll just use a stock photo until I can re-make it again.  It’s very delicious bread.  I never knew zucchini could work so well into a dessert type bread!  I cooked it for the full time and even followed the directions for the toothpick coming out with just a few crumbs attached, but it tricked me.  So later, I had to cut it into slices and re-bake on a baking sheet, which helped.  I think the problem was I could only twist and drain so much moisture out of the shredded zucchini.  Next time I will use an orange squeezer to get more moisture out.  My 8 year old loved it – but then again, it is more desserty vs. a hard sell.  Enjoy!

INGREDIENTS:

  • 1 1/2 lbs. zucchini shredded
  • 1 1/4 cups packed (8 3/4 oz.) brown sugar
  • 1/4 cup vegetable oil
  • 2 large eggs
  • 1 tsp. vanilla extract
  • 1 1/2 cups (7 1/2 oz.) all-purpose flour
  • 1/2 cup (2 3/4 oz.) whole-wheat flour
  • 1 T. ground cinnamon**
  • 1 1/2 tsp. salt
  • 1 tsp. baking powder
  • 1 tsp. baking soda
  • 1/2 tsp. ground nutmeg
  • 2/3 cup walnuts (toasted and chopped), optional
  • 1 T. granulated sugar
  • Chocolate chips are a great addition (optional)**

**Known IC irritants, tread carefully! You can make this IC safe by omitting the cinnamon and choc. chips. 

DIRECTIONS:

  1. Adjust oven rack to middle position and heat oven to 325* F.
  2. Grease 8 1/2 x 4 1/2″ loaf pan.
  3. Shred zucchini with either the large holes of a box grated (or use your food processor shredding disc like I did.)
  4. Place shredded zucchini in center of dish towel.  Gather ends together and twist tightly to drain as much liquid as possible, discarding liquid (you should have 1/2 to 2/3 cup liquid).  This method didn’t work well for me, next time I will use an orange squeezer (click here) to remove even more liquid from the zucchini.
  5. Whisk brown sugar, oil, eggs, and vanilla together in medium bowl.  Fold in zucchini.
  6. Whisk all-purpose flour, whole-wheat flour, cinnamon, salt, baking powder, baking soda, and nutmeg together in large bowl.
  7. Fold in zucchini mixture until just incorporated.  Fold in walnuts, if using.  Fold in chocolate chips, if using.
  8. Pour batter into prepared pan and sprinkle with granulated sugar; it makes a nice crust.
  9. Bake until top bounces back when gently pressed and toothpick inserted in center comes out with few moist crumbs attached – 65-75 minutes.
  10. Let bread cool in pan on wire rack for 30 minutes.
  11. Remove bread from pan and let cool completely on wire rack, serve.


Eggless Waffle Recipe *

eggless-waffles

This is one of those recipes you must know about if you a) like good waffles and/or b) have an egg allergy.  Even though my husband is allergic to eggs, yet I can have eggs, I still enjoy these waffles on a monthly basis.  We’ve made them nearly every month (or every other) for over a decade – so you know they are good!  They’re from Rosemarie Emro’s “Bakin’ Without Eggs” book.

INGREDIENTS:

  • 4 cups all-purpose flour (If you want to make it healthier like we do, use up to 3 cups white whole wheat flour or whole wheat flour with 1 cup all-purpose flour.  Or, if you want to play it safer, do 50% all purpose and 50% wheat flour).
  • 2 T. + 2 tsp. baking powder
  • 1/2 tsp. salt
  • 6 T. sugar 
  • 4 cups (1 quart) buttermilk (It’s really best if you use the real buttermilk here and not that trick to make buttermilk out of milk and lemon).
  • 1/2 cup canola oil or applesauce (hint: canola oil works best!)
  • 1 tsp. real vanilla extract
  • Optional: blueberries, chocolate chips*, or your choice of small fruit to mix into batter.

**Omit chocolate chips to make it IC safe.  

DIRECTIONS:

  1. In stand mixer or in a large bowl, combine all ingredients with a whisk attachment or a whisk.  Whisk until smooth.
  2. Preheat your waffle maker according to the maker’s directions.  Decide if you need to spray your waffle maker with nonstick spray.  We have found it helps to release.
  3. Depending on the size of the wells of your waffle maker, pour just enough batter in it to fill up the wells just enough.  Read your manual for recommendations.
  4. Makes approximately 15-20 waffles, depending on size.

Basic Crêpe Batter

crepes


I had a very successful crêpe experience and wanted to share the recipe and tips.  This is one of those recipes high in technique so it’s extra critical to follow the directions to the letter.  Whether you like them sweet or savory, there’s a crêpe for you!  Enjoy!

INGREDIENTS:    (Makes about 7-10 crêpes depending upon batter usage, so you can double this if you like).

  • 2 eggs
  • 1/2 cup milk
  • 1/2 cup water
  • 1 cup flour
  • 1/4 tsp. salt
  • 2 T. melted butter
  • (To make it richer, omit the water and use 1 cup of milk instead.  This is what I did.)
  • (To make it sweeter, add 2 T. sugar and 1/2 tsp. vanilla.  I did this also.)
  • (To make it more savory, add 1 T. chopped fresh herbs.)

DIRECTIONS:

  1. Blend batter ingredients in a blender until combined.
  2. Let batter stand 30 mins. at room temperature, or cover and chill up to 48 hours.  (I left mine to refrigerate one day).   This gives the flour time to absorb the liquid and the bubbles time to subside.
  3. Heat a nonstick skillet or crêpe pan over medium heat.  Brush lightly with melted butter or vegetable oil.  Make sure you brush just a little butter on and you only need to do it every few crêpes, as needed.  With less butter/oil, the crêpe browns better!
  4. Ladle batter (about 1/4 cup for an 8″ skillet) in center of pan.
  5. Working quickly, tilt the skillet, and swirl the batter around to coat the entire bottom.  It should be very thin!
  6. Cook until the edges pull away from the pan, the top loses its sheen, and the bottom is lightly browned, 45 sec to 3 min. depending on your skillet size and heat level. Use a thin heatproof spatula to loosen the crêpe from the pan and lift an edge.
  7. Grasp the raised edge with your fingers and flip the crêpe over in one quick, fluid motion. You can also use the spatula.  Cook until the second side is lightly browned, 15 sec to 1 minute more.
  8. Slide the crêpe onto a plate.  Repeat steps 3 to 5 with the remaining batter, buttering the skillet only as needed and stacking the finished crêpes.
  9. Hint: the first crêpe is usually garbage because your skillet is getting to the proper temperature, so don’t give up!
  10. Eat plain or fill with toppings – sweet, fruity, or savory, roll up and enjoy!